How to Add Beautiful Optin Forms to Your WordPress Website
Email marketing is one of the most effective way of connecting with your audience. Social media messages are not seen if the user is not online when you publish your message, however email marketing allows you to send your message directly to their inbox. That is powerful.
The first step in email marketing is to encourage people to sign up to your email newsletter. The standard sign up forms that email marketing services provide are plain and uninspiring. That is why there are so many premium plugins available for WordPress that allow you to add beautiful sign up forms to your website.
Many of these plugins cost up to $100, however I recently started using a free solution that works just as well. The plugin in called Optin Forms. It allows you to insert an email newsletter sign up form directly into your post area.
It currently supports six popular email marketing services:
- AWeber
- iContact
- MailChimp
- GetResponse
- MadMimi
- Interspire Email Marketer
Integrating your email marketing service is straight forward, though the process is different for each service. For example, GetResponse asks for your webform ID, whereas MailChimp asks for the form action URL.

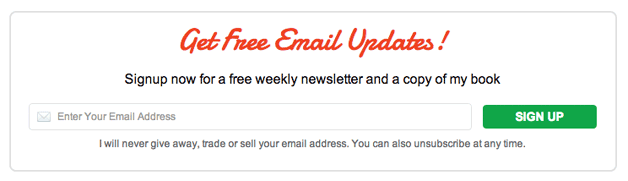
It comes with five great form styles. These include dark and light styles, larger forms and smaller forms. The forms are mobile friendly too.

Every aspect of your forms can be styled through the settings area. You can change the background color, border color, font type, font size, and font color. The size of input fields and the width of the form can also be adjusted.

In addition to the email field, there are four optional parts: form title, form subtitle, the name field, and the disclaimer. Each of these are enabled by default, however they can be hidden through the settings area.
There is also a custom CSS box for adding your adding more customized styling.

Your form can be automatically inserted into posts, pages, and custom post types. There is also an option to exclude the form from specific posts or pages.
The settings are configured so that posts and custom post types use the same settings. This may be frustrating to some users who want to configure posts differently from their custom post types.
Forms can be displayed after the first paragraph, after the second paragraph, or at the end of your article. Alternatively, you can disable the form and insert it manually using a shortcode.
The developer of the plugin has also integrated an option to display a credit link. This can be hidden if you wish.

I am currently using the first form style on my own blog. I have seen a slight increase in sign ups since using the form. Bear in mind that I previously displayed a newsletter sign up form at the bottom of my articles. Those of you who do not currently display a form in this area will see a larger increase in sign ups.
Unfortunately, the plugin does not track the number of impressions or the number of sign ups. Therefore, you will need to monitor this directly through your email marketing service.

I have been using Optin Forms for the last month and have been very happy with it. It is actively updated and the five form styles that are on offer look great. The ability to style forms through the settings area gives you even more control of how your forms look.
I recommend checking it out if you are looking for a way to insert a beautiful sign up form directly into your post area.
Thanks,
Kevin

Leave a Reply