MailChimp and WordPress: How to Connect These Two
There are a lot of rumors going around about the email marketing being dead. However, with the stats pointing on over 200 million emails are sent every minute, we get it. That’s not the case! And MailChimp has got an important role to play in it, lately.
If you wonder why email marketing is so effective and is so popular web-wide, here are some of the reasons it still works:
- Everybody has an email address (or even two, sometimes three of them )
- It has a larger reach
- Emails are personal
- It’s not expensive
- Emails have a higher ROI
- It’s more targeted (since subscribers have willingly subscribed to your list)
- It’s evolving
And, believe me, the list could be extended with many more points. Now with reasons mentioned above, Do you still wonder if it is a worthwhile strategy to pursue? I hope you don’t because email marketing is one of the most effective and widespread marketing channels used nowadays.
There are lots of emailing services out there offering a wide range of tools to take your email marketing to the next level, but the most distinguished one is, no doubt, MailChimp. Over the last few years marketers, bloggers, website owners are actively leveraging Mailchimp’s potential to get more subscribers, drive more traffic, and increase sales. Now Mailchimp offers integration with various web platforms, which also includes WordPress and provides more simple, easy and handy way to manage lists, forms, subscribers and sent emails.
Tools offering MailChimp integration with WordPress are also plenty, but not all of them offer the same value. In this post, I’d like to introduce MailChimp WD, a feature-packed MailChimp WordPress Plugin, and walk you through some easy steps that will help you install and activate the plugin on your website. It will enable you to create customized subscription forms, and let you manage your forms, emails, and listings directly from your dashboard. On the go.

Here is a step by step guide on how you can easily integrate your WordPress website with MailChimp using MailChimp WD plugin.
Installation
To install the plugin on your website, you should head over to wordpress.org, go the plugins section and type MailChimp Forms WD in the search box. It will show you some results where the first one is probably going to be MailChimp WD.
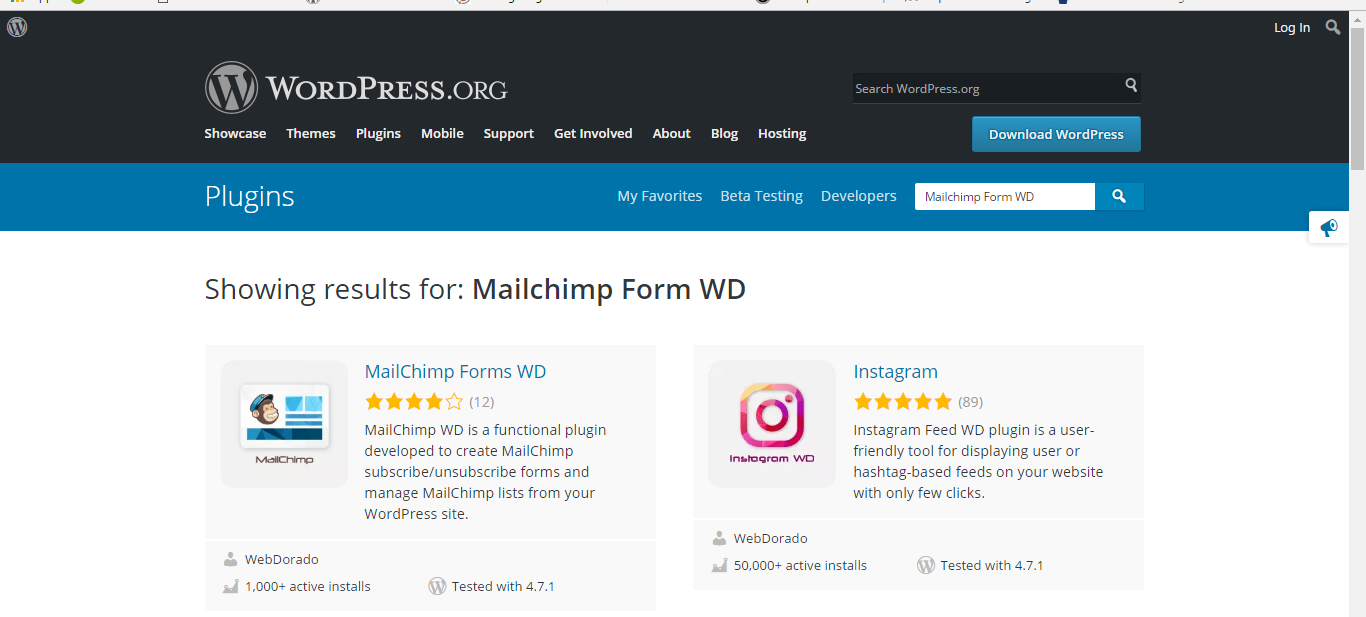
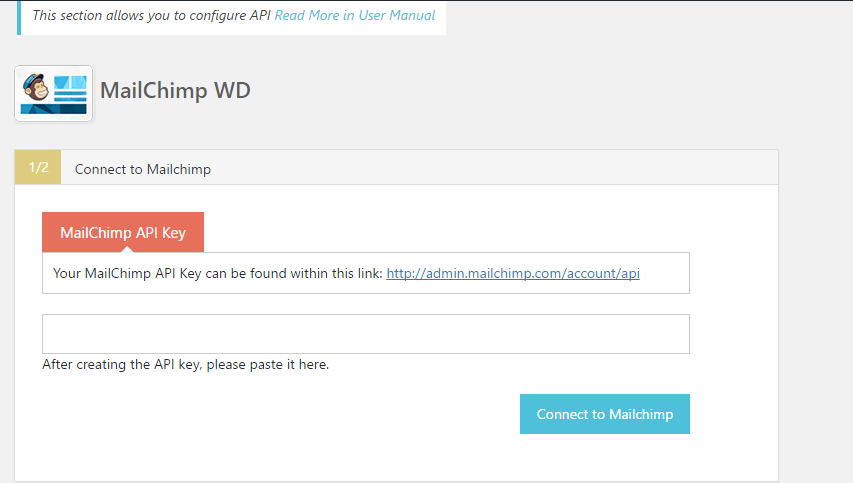
Go to the plugin page and download the latest version of the plugin. Install it on your website from WordPress admin panel and activate it. In order to be able to start creating forms, you’ll first need to provide the API key of your MailChimp account. You can find your API key here. Copy and paste the key in the input field and you should be good to go. Your website is now connected to your MailChimp account.
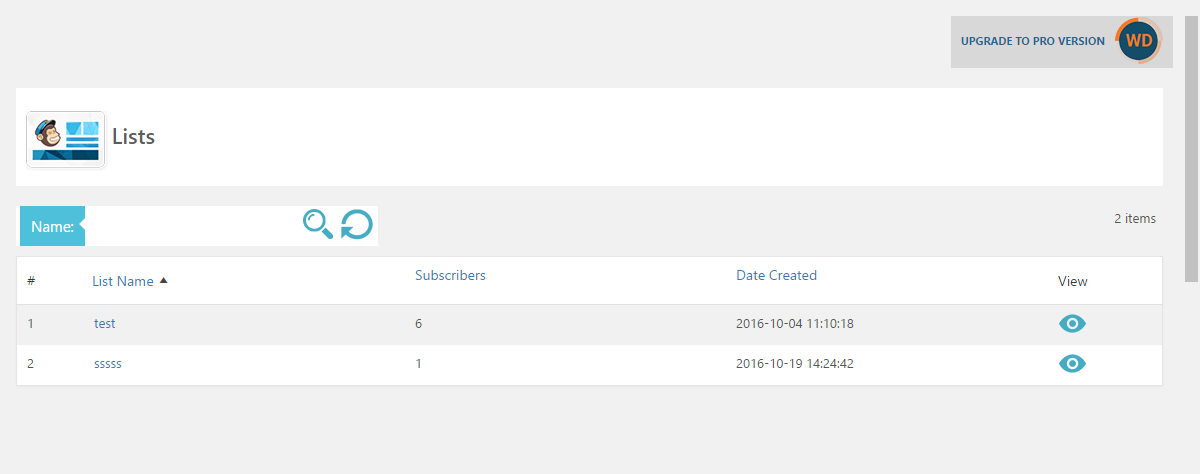
Lists
If you already have some lists created in your MailChimp account, those lists will automatically appear under lists section. As you click on any of those lists the plugin will give you a quick overview about it and will show the fields of the form you use to collect subscribers for this specific list. You can also search for a specific user in the list, and export the list data to a CSV file.
Forms
Creating a form is fairly an easy process. To create a form you’ll need to go to the forms section of the plugin and click on the “Add New” button. First, give it a title and choose a theme for it (there are 13 to choose from, more on them later). Situated directly below are the form header options, where you can add a description, upload an image, select an animation for it, and choose whether or not to show the image on mobile phones.
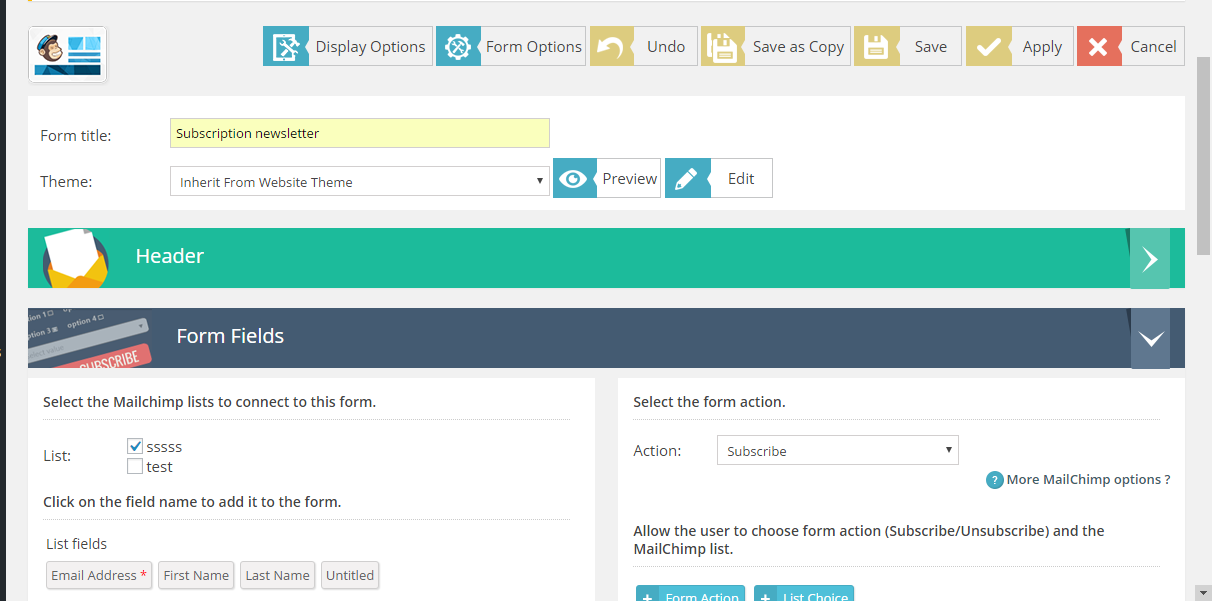
Under the header options, you’ll find form fields settings and options. Here you can select the lists that you want to connect to this form and choose the fields that you need to have on it. You can choose the form action, whether it is a subscribe or unsubscribe form. Moreover, the plugin allows you to leave this up to the users. You can allow your users to choose the form action (subscribe/unsubscribe) and the list themselves.
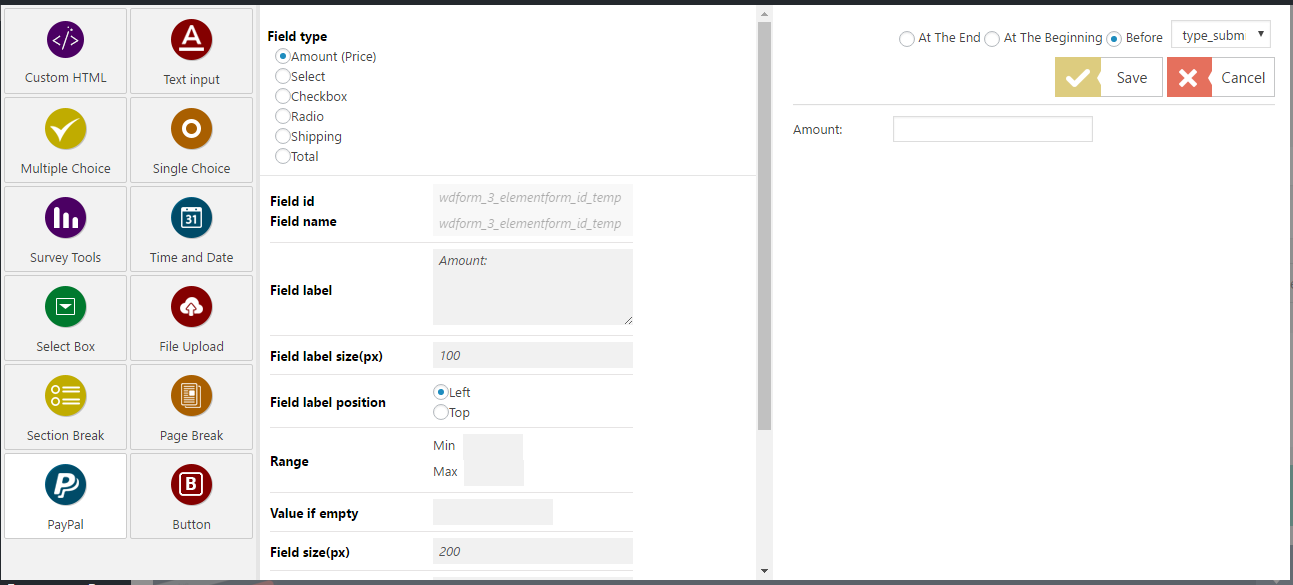
Custom Fields
MailChimp WD gives you a lot of flexibility in terms of the forms you create. Apart from the fields that you can add to the forms from your MailChimp account, the plugin allows you to further enhance the functionality of the forms by adding custom fields. Field options are many to make sure you can collect any kind of information from your visitors, such as custom HTML, checkboxes for multiple choice questions, page break options, survey tools, additional fields for text, time and date input, and more. There is also a PayPal integration field available, which you can use to accept payments for subscribing to a list, or if you want to sell a product with a form. To check the full list of the custom field options click here.
Conditional Fields
If you need to hide/show any fields on the form based on the specific selections your visitors make, MailChimp WD plugin allows you to do that. It comes with an outstanding conditional fields option, which is a great way to avoid receiving an information you don’t need.
To add a condition go to the form options in the plugin’s admin area, and click on the conditional fields section. There you’ll find the actions of the condition, which are apparently show/hide, and the form field to which that action will refer to. You can also configure under which circumstances the condition will occur. It can occur if all or any of the selections match.
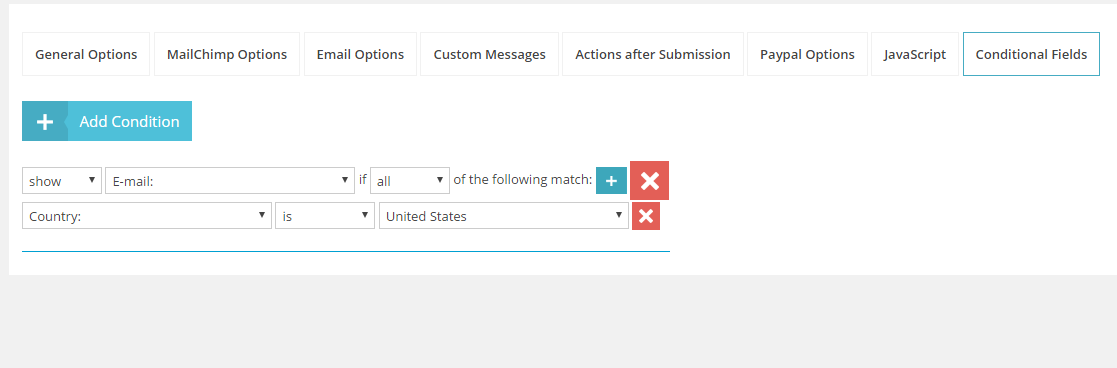
A good example of a conditional field would be if your choose to show the email field in the form only to users from a specific location. To users from other locations, the field asking for an email address will be hidden. Isn’t this just great?
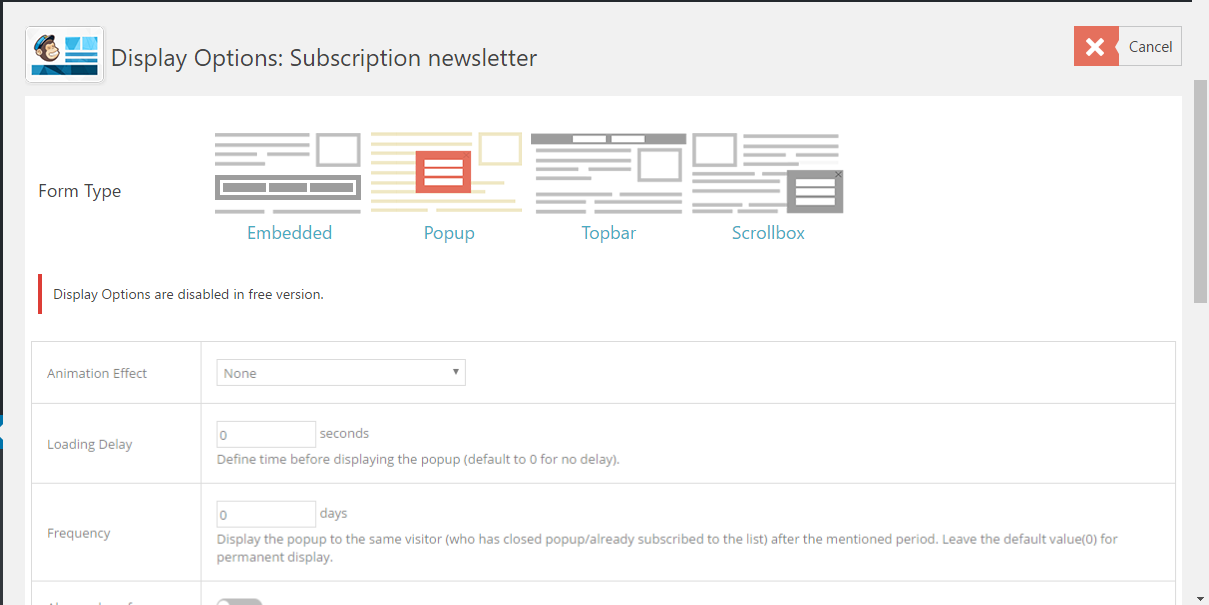
Form Display Options
You can display the forms on your website in 4 different ways. The plugin comes with Popup, Topbar, and Scrollbox form options and allows you to embed forms to individual posts and pages using the provided shortcodes. Popup, Topbar and Scrollbox display options come with customizable settings that you can configure to fit your needs. You can choose the post types, pages, and categories where the forms will appear and specify the frequency of the displayed form. It identifies the period after which the form will be displayed to the same visitor. The frequency value is set in days, so if you want to display the form every single time a user visits your site, just set the frequency value to 0.
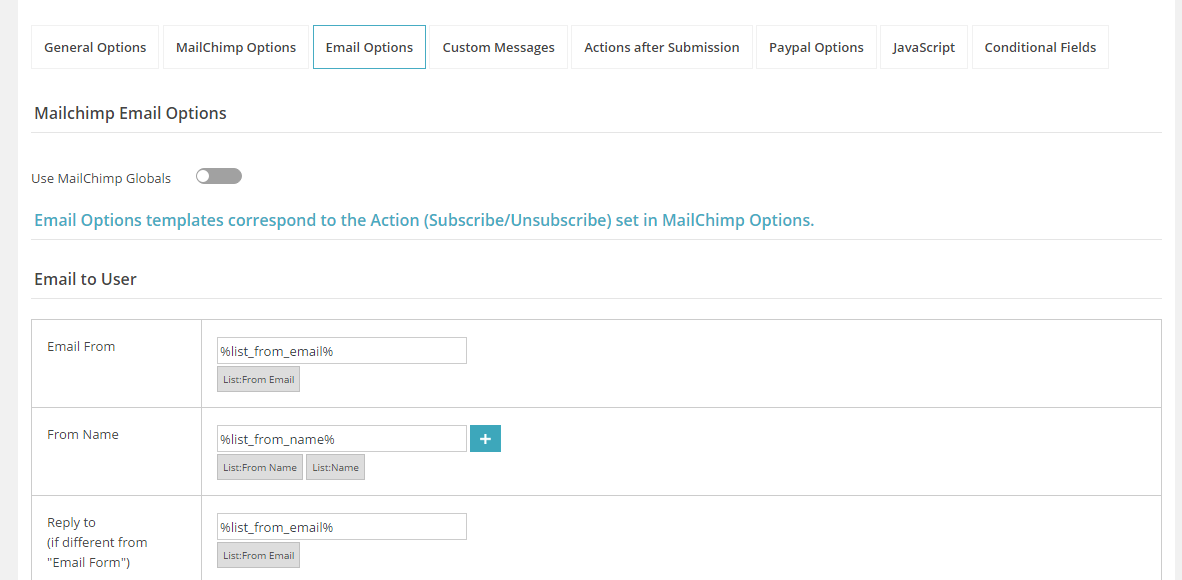
Emailing Options
Mailchimp WD comes with extensive emailing options to meet your every need. It allows you to use either MailChimp’s global emailing options, or go a step further and use the emailing options offered by the plugin. You can configure email options sent to users and administrators. While configuring email options, you can still use data from lists of your MailChimp account, such as list name, form name, subject, etc.
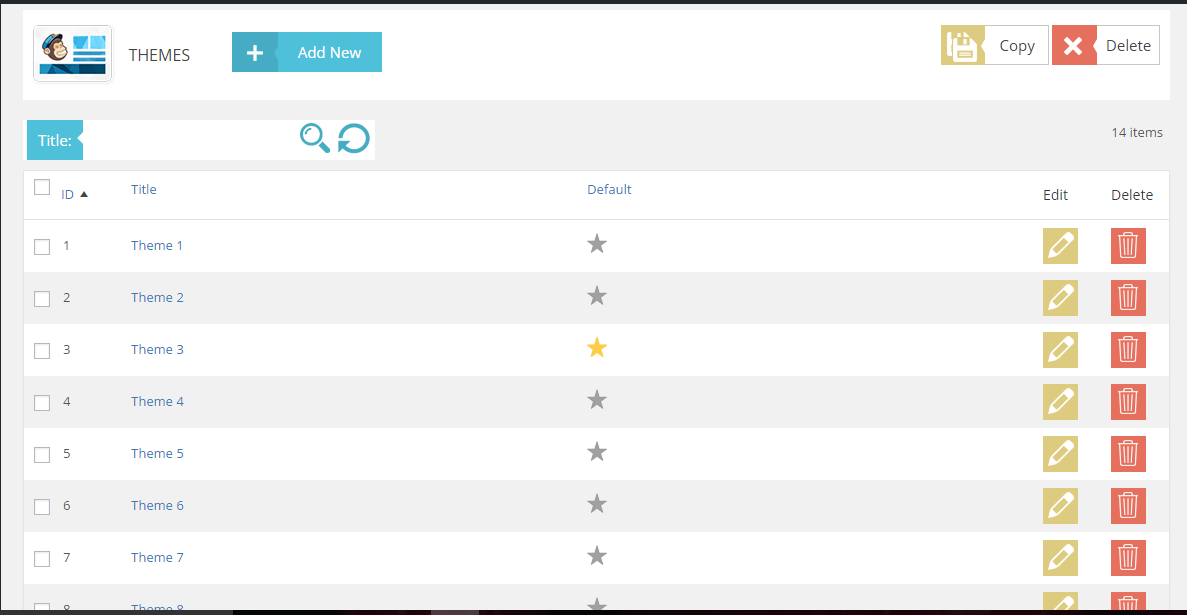
Themes
As earlier mentioned, MailChimp WD comes with 13 fully customizable form themes. The number of the available themes is impressive and so are the theme customization options.
To get to the themes, go the theme section in the plugin admin area. Choose the theme you’d like to customize and click on the yellow button in front of it. The plugin will take you to the theme settings, where you can adjust almost everything to your needs, from general parameters to button and pagination options.
An outstanding feature of MailChimp WD is that it allows you to customize the form header from top to bottom, using custom colors, images, and other custom parameters.
Submissions
The submissions section is the place where you can view all your submitted forms. As you choose a form from the drop-down menu, a number of entries, conversion rate and a number of views of this form will be displayed at the top, and the submitted data will appear below. You can filter data by entered values, submission date, submission ID, and submitters IP.
The plugin allows you to customize the entry views by temporarily adding/removing some of the form fields that you don’t need at the moment.
IP Blocking
Now we got to spam. We all know how frustrating it is to get spammy content with submissions, so this is where you can leverage the IP blocking feature of MailChimp WD. You can block specific IP addresses that send spammy submissions and unblock them afterward if necessary. Blocked addresses will appear in Blocked IP section of the plugin.

MailChimp WD plugin is a user-friendly and comprehensive tool that you can use to manage all your Mailchimp listings and forms without leaving your website’s dashboard. It is fairly easy to install and setup. MailChimp WD is highly recommended for people who use MailChimp on a regular basis to send newsletters and other mails for their WordPress websites.
Disclaimer: This is a sponsored post. We have not reviewed the plugin but we think this product will add value to your WordPress business.

Leave a Reply