MailChimp with WordPress: Ultimate Guide for integration
It’s evident that if you have a website you need visitors. If you treat a website visitor as just another visitor then you might lose into growing your website. You need to treat them like your guests and make them visit to you again. But in this virtual world, the only thing that can make it happen is by making them sign up for your newsletters.
If you want to create a list and send out newsletters to your subscribers for your WordPress site, then you need to have a mailing service at hand. And what better way than MailChimp?
MailChimp is one of the most favored email delivery platforms right now and with over 7 million users relying on it, you know you can’t go wrong. (We trust it too!)
Today, I am going to provide you with an in-depth guide on how to integrate MailChimp with WordPress.
MailChimp : The What and Why
What is MailChimp?
MailChimp is one of the best email marketing services out in the market right now. It provides you with simple options for designing and sending newsletters to your subscribers.
Why use MailChimp?
MailChimp has been in the market for a very long time now. They know the ins and outs of the mailing service. Moreover, it is one of the most affordable service especially for beginners. If you have less than 2000 subscribers, they won’t charge you anything. If your subscribers grow more than 2000, then you will be asked to upgrade your account to a paid plan.
Apart from that, they have loads of cool features like email themes, all of which can be edited through a drag and drop editor, setting up RSS for email subscriptions, setting up auto-responders, campaign analytics, mobile apps, etc.
(Alternatives to MailChimp for sending out newsletters)
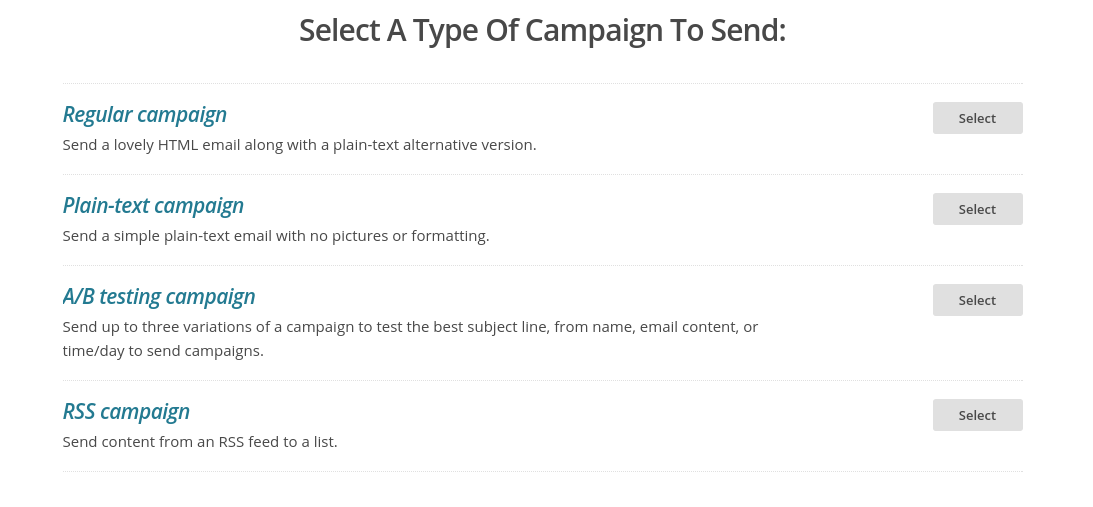
Kicking Off with MailChimp
First of all you need to sign up for a MailChimp Free Account (If you already have more than 2000 subscribers somehow, you may want to get a paid account).
First of all you need to sign up for a MailChimp Free Account (If you already have more than 2000 subscribers somehow, you may want to get a paid account).
Visit the MailChimp website and click on ‘Sign Up Free’.
Now, fill in your details and to create an account.
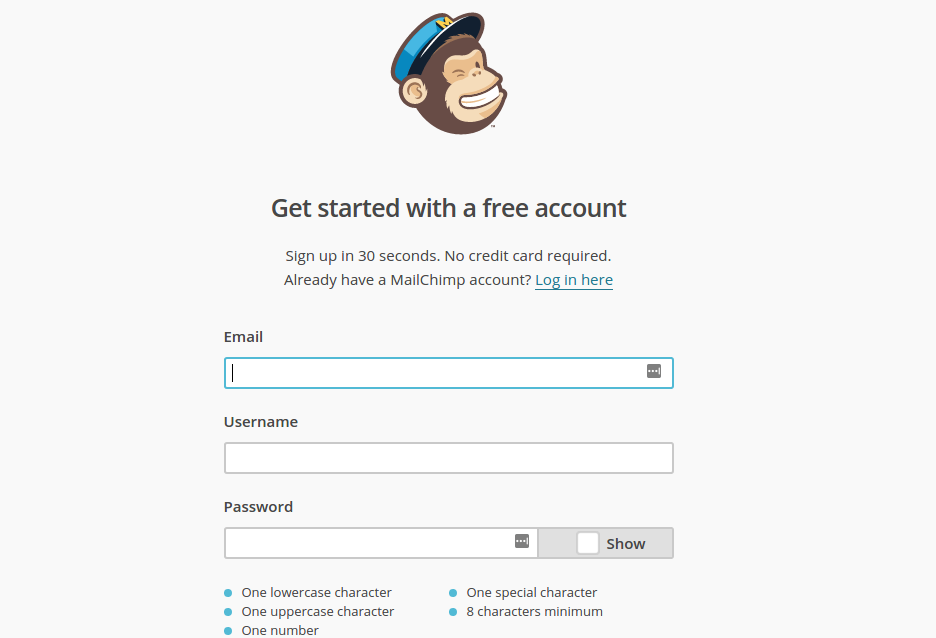
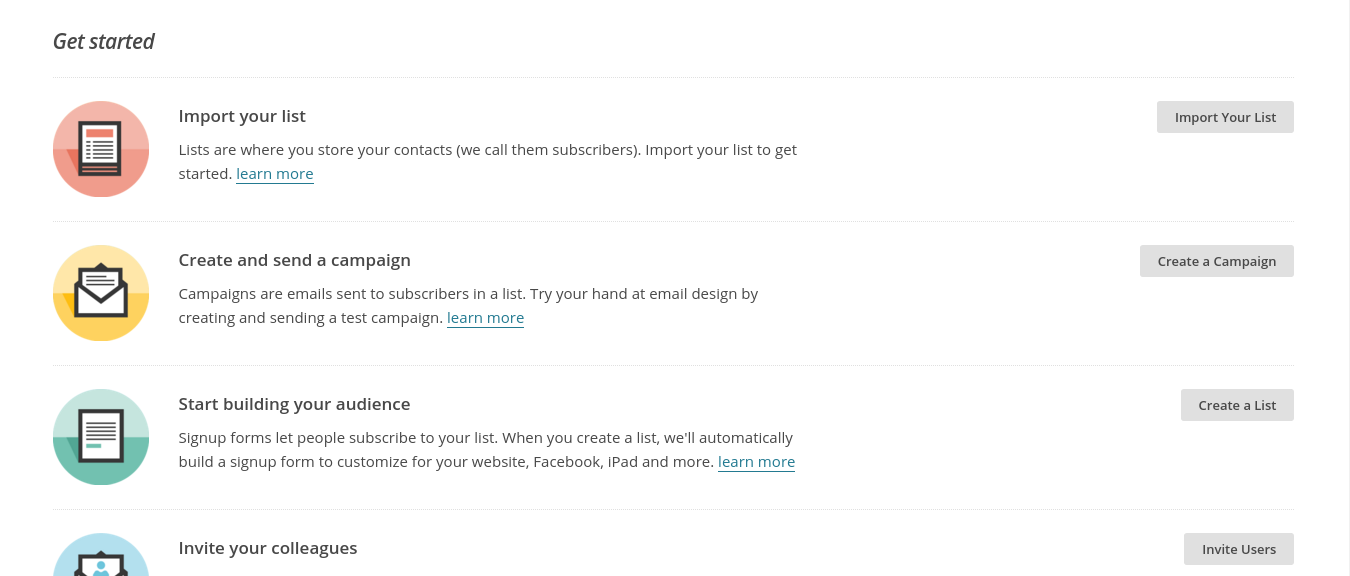
Once you have successfully signed up, you will be redirected to the MailChimp’s dashboard.
Integrating MailChimp with WordPress
By now, you must have got an idea that if you want a mailing list, MailChimp is the way to go. In order to go further, you need to integrate MailChimp with WordPress, which is fairly easy to do.
In order to integrate MailChimp, you need to have a subscription form where the users will sign up to get added to your list. These subscription forms can be integrated in two ways:
- Through a plugin
- Manually by pasting source code
How to integrate MailChimp with a plugin
MailChimp for WordPress is the highest rated WordPress Plugin to integrate MailChimp with WordPress. This plugin produces clean and customizable subscription forms to add to your site.
You can either download it from the WordPress directory or install it direct from your WordPress backend. Make sure you activate the plugin once it is installed.
Once you install this plugin, you need to obtain an API key from your MailChimp account. This will allow the plugin to communicate with your MailChimp account and users being added to your list.
To start with, you need to create a subscription form with suitable fields. You can select fields from the available options to directly add in the form without typing the code.
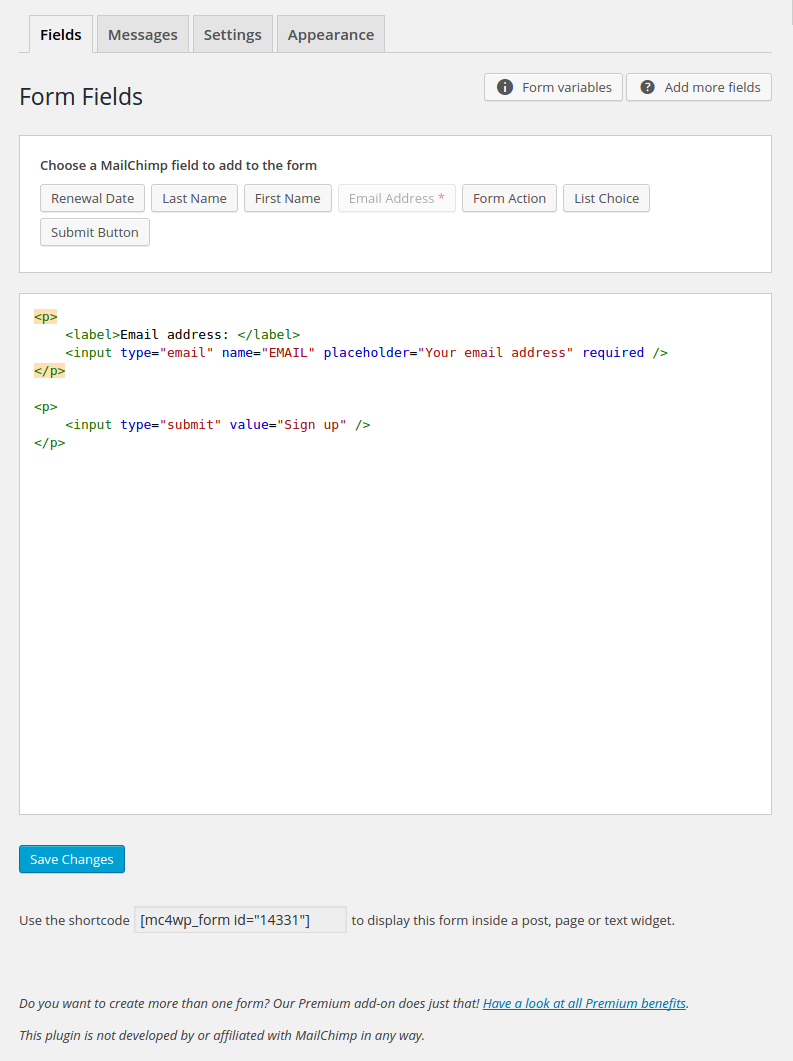
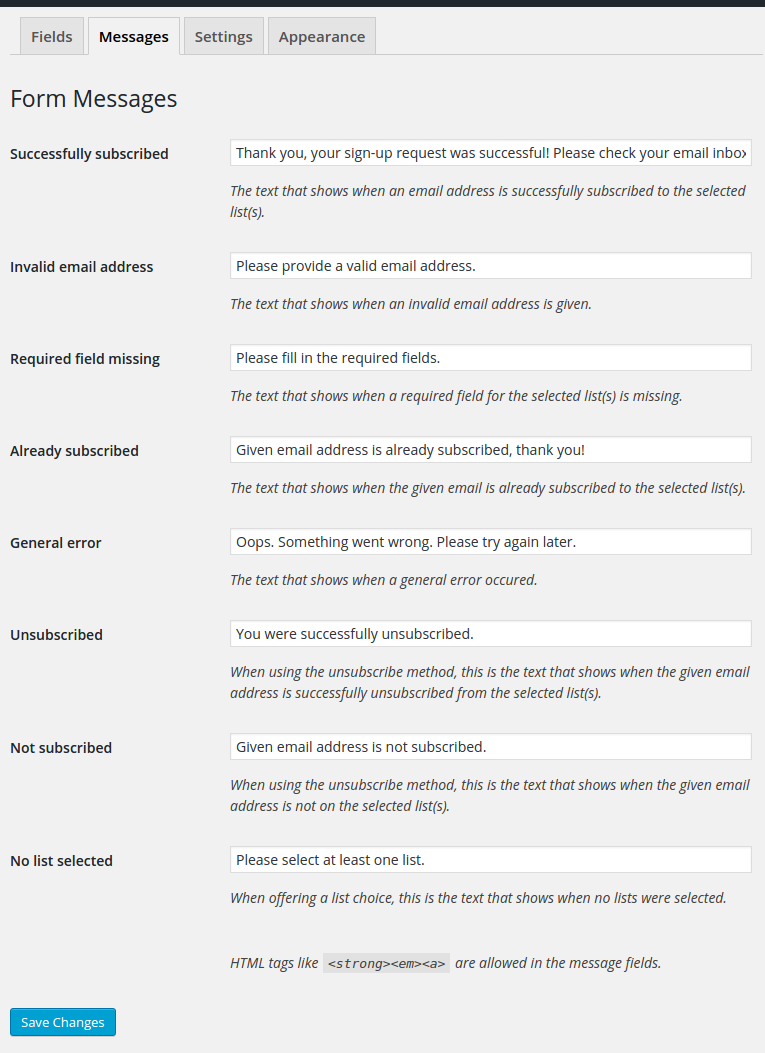
Next, you can customize the messages that will be displayed to the user while filling the subscription form. You can add your own messages for subscribe, unsubscribe, invalid email address, missing fields, etc..
Further, in the settings tab, you can select to which list users will be subscribed (In case, you have multiple lists, you can select one, some or all lists). You can choose whether to use double opt-in or not. Choosing double opti-in is highly recommended as it authenticate subscriber’s email address. You may also choose to update the existing subscribers or not.
The form behavior settings allows you to hide/display the form upon successful subscription. In the behavior settings only, you can add a URL to which user will be redirected after subscribing.
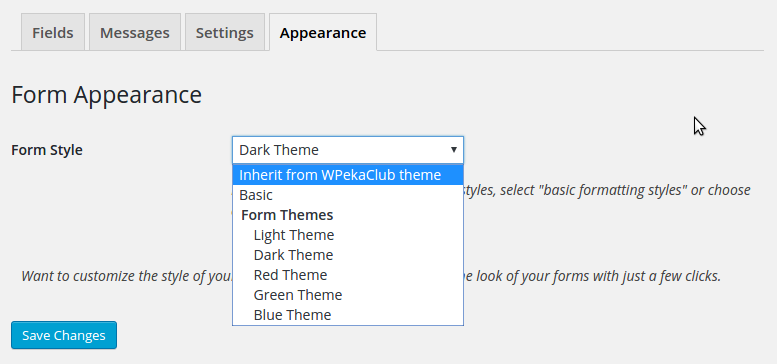
Within the appearance tab, you can select the appearance as that of your current WordPress theme or select from the predefined themes. We would recommend you to inherit appearance from your WordPress theme only, as you want to blend in the subscription form with your site.
Once you have created a form, make sure to save the settings.
How to add forms on your site?
To subscription forms on the site you can either add the shortcode to your page or use the integrated widget.
If you wish to use the first option, you will get a shortcode for the form by clicking on the ‘Get Shortcode’ button or you can find the shortcode underneath the builder module. Next, you will have to paste this shortcode inside your posts or pages to display the form.

If you want to use the integrated widget option, just drag and drop to any area you want. You can also give it an optional title of your choice.

This is how you integrate MailChimp with WordPress using a plugin. Now, onto how you can do it with the help of the plugin.
How to integrate MailChimp manually
Although, integrating MailChimp with WordPress through the plugin is quick and easy, there is another way through which you can add the subscription forms to your site. This way is generally favored by developers, as it requires write a few lines of code and copy-paste it on your site.
This integration can be done through the MailChimp dashboard itself as MailChimp itself offers subscription forms to be added onto your site.
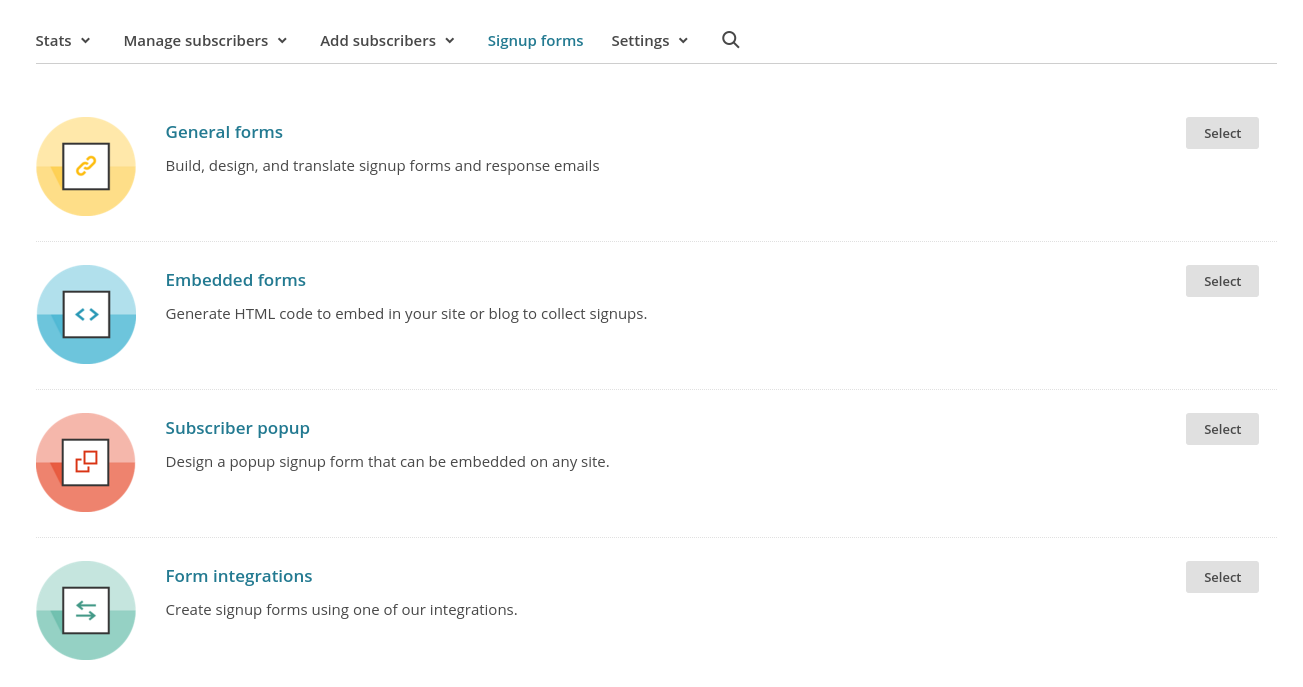
In order to create a custom form, you need to first select a List from the dashboard. Inside the List page, you will find Signup forms tab.
Within the Signup forms tab you will find four different types of forms you can create.
- General forms
- Embedded forms
- Subscriber popup
- Form integrations
Under the Embedded forms, you can easily customize your form and a HTML code is generated for you to be pasted onto your site. You can even select different themes for designing your form.

Now, just paste the code onto your site wherever you want your subscription form to show. And that’s it.
(Know effective ways of increasing your email deliverability rates)
The Real Deal
Once you have done with the integration, you have to design newsletters that will keep your subscribers engaged.
Setup RSS Feed Newsletter Campaign
MailChimp allows you to create RSS-driven campaigns through which you can create newsletters that are sent automatically whenever a post is published.
To setup an RSS-Driven campaign, you need to first login to your MailChimp account and click Campaigns >> Create Campaign
On the create campaign page, you will find an option to create RSS campaign.
After selecting the RSS campaign, you will be asked to provide your RSS feed URL. Here you can select when do you want to send out the campaign. You can select between every day, every week and every month options. Additional to this, you can select the time at which the campaign will go out.
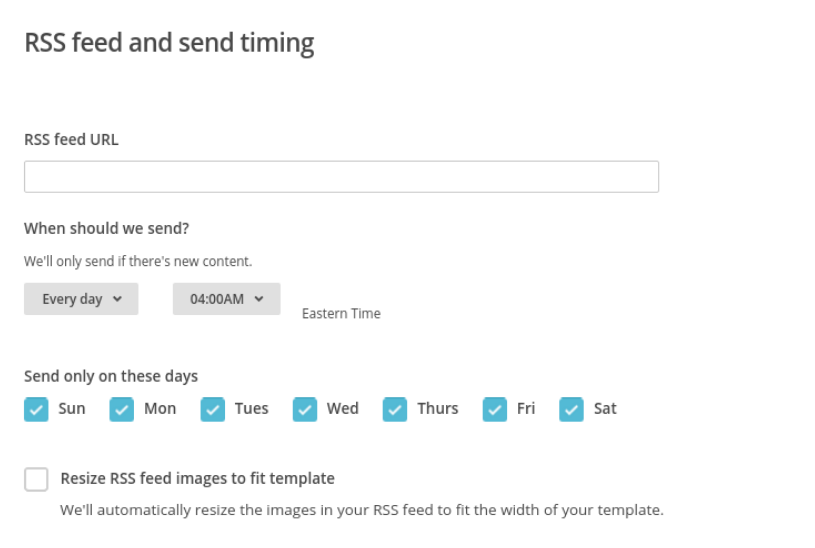
Ahead of this step, you will be asked the usual stuff for creating the RSS campaign – Naming the campaign, adding subject line, from name, etc.
Once you complete the above section, you will have to select a theme for the campaign and design and schedule it.
MailChimp Analytics
MailChimp recently closed their Analytics360 plugin and introduced eCommerce360. eCommerce360 is an integrated functionality within MailChimp which allows you to track visitors to your site from your email campaigns. It captures order information and pass it back to MailChimp.
This functionality make MailChimp more effective as you’ll come to know which of your campaign(s) generated more traffic or sales.
Conclusion
Even after so many years and so many competitors, email marketing is one of the best way to reach out to people.
MailChimp with WordPress is an awesome combination. This is allowed lot of WordPress website owners a helping hand in maintaining and managing their subscribers. If you haven’t already started building a list, now is the right time and MailChimp is the way to go.
Leave a Reply