How to add Google custom search in a WordPress site

WordPress comes with a default search feature, which works reasonably well for very basic sites.
Many users, however, find that the default search has some shortcomings, especially for larger sites with a variety of content types.
For many queries, the baked-in WordPress search doesn’t find or display the appropriate results. This can become more and more frustrating as you build up your site with more and more content.
Many site owners find that they need more robust capabilities than the default WordPress search can provide. Fortunately, there is an extremely powerful search engine called Google, which you must have heard of.
You can actually harness the power of Google within the confines of your very own WordPress website. This means that when someone does a search on your site, Google will do the searching, but the results will be limited to content from your website and not from the rest of the Internet.
There are basically two ways to implement Google custom search in WordPress. One by installing a plugin and another manually adding it.
However, the easier one of the two is using a WordPress plugin. But, advanced users may prefer to integrate a custom Google search into their website manually, without the use of a plugin. This method involves editing your theme’s core files.
In this article, I’m going to cover both the options in detail. So, let’s start.
Implementing Google Custom Search using WordPress plugin
There are multiple plugin available in market, but the best we could find is WP Google Search Plugin. The plugin is completely free and should work with any solid WordPress theme.
Using the WP Google Search Plugin
Step 1 – Install the WP Google Search plugin
- Within your WordPress Dashboard, navigate to Plugins
- Select “Add New”
- Search for the WP Google Search plugin
- Choose Install

- When the plugin is installed, click “Activate.”
Step 2 – Set Up a Custom Search
Before you start using the WP Google Search plugin, there are some steps you will need to take to get everything set up properly.
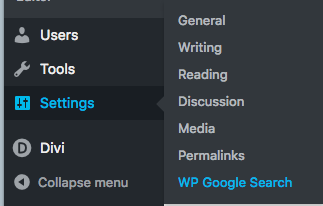
- Once you’ve installed the WP Google Search, you’ll want to head over to Settings -> WP Google Search to set up the plugin.
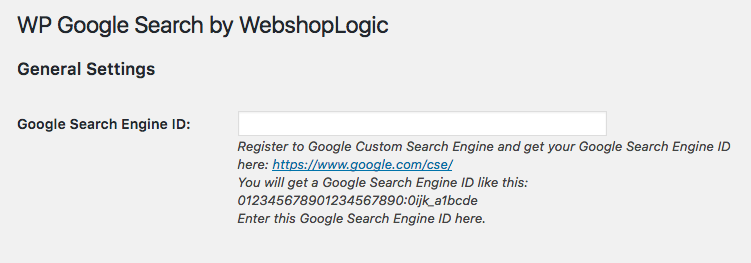
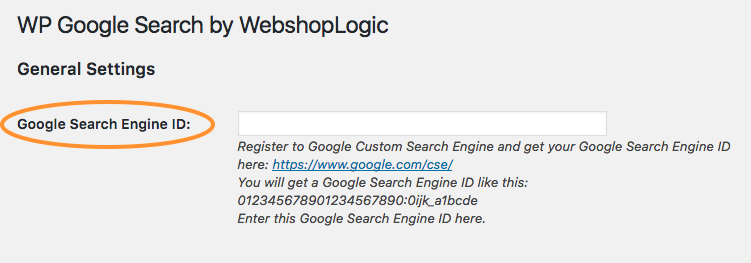
- You should see a field for “Google Search Engine ID.”
- In order to get the required ID, you will want to visit the Google Custom Search page and register a custom search engine. Simply click the “Create a custom search engine” button.

- To set up your custom search, you will need to enter you’re the appropriate URL into the “Sites to search” field. In most cases, this will simply be the main URL for your site. Don’t use shortened URLs.
- You can also enter more than one URL in the event that you want to search and display results from across multiple websites.
- For specific queries, you also have some options here in terms of which content or what kind of content from your site you want Google to search.
- Again, most users will simply want to enter their main website address, which will display results from across the entire site. But there are some other options:
- For a site-wide search that includes everything on your site, just enter the main address of the site (such as www.yoursite .com).
- To search an individual page, enter only the URL for that page (www.yoursite.com/single-page)
- To only search specific types of content on the site, such as Posts or certain categories, you can enter the appropriate link for that information, depending on your permalinks structure within WordPress (such as www.yoursite.com/posts).
- Select the language you want to use (English is the default).
- Click the “Create” button.

Step 3 – Get Your Search Engine ID
Awesome! You have successfully set up your custom search engine. Before you add it to your WordPress site, however, there are still a few more things you will want to do.
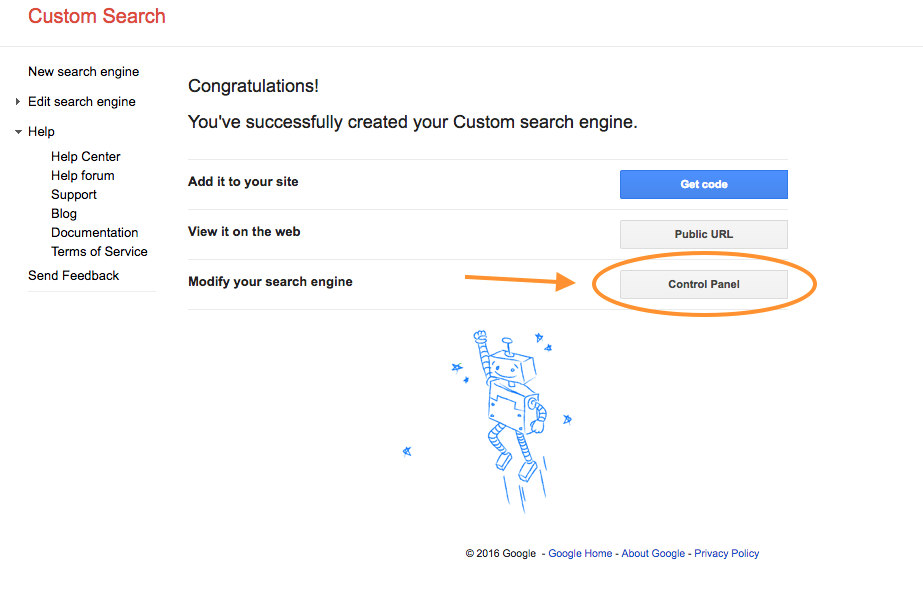
- On the Google Custom Search page, click the “Control Panel” button.
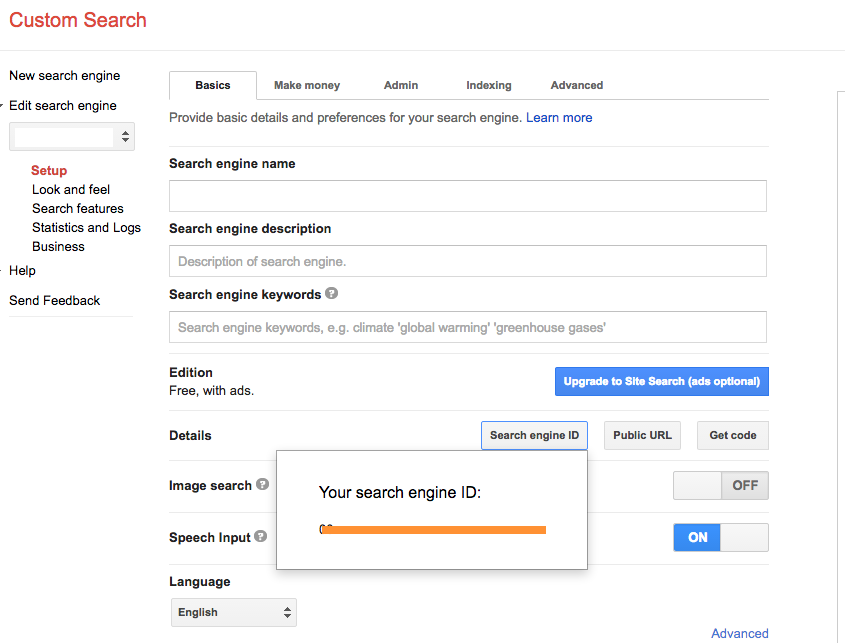
- Within the Control Panel, you will see a button for “Search engine ID”. This is the unique ID for your custom search.
- Click that button and copy the code for your Search Engine ID.
- Paste that code into the field in the WP Google Search Plugin for “Search Engine ID”
- Click “Save” to save the Plugin settings within WordPress.
Step 4 – Configure the Display
- Back in the Google Custom Search control panel, you will want to select the “Look and Feel” option from under Setup.
- Choose “Results Only”
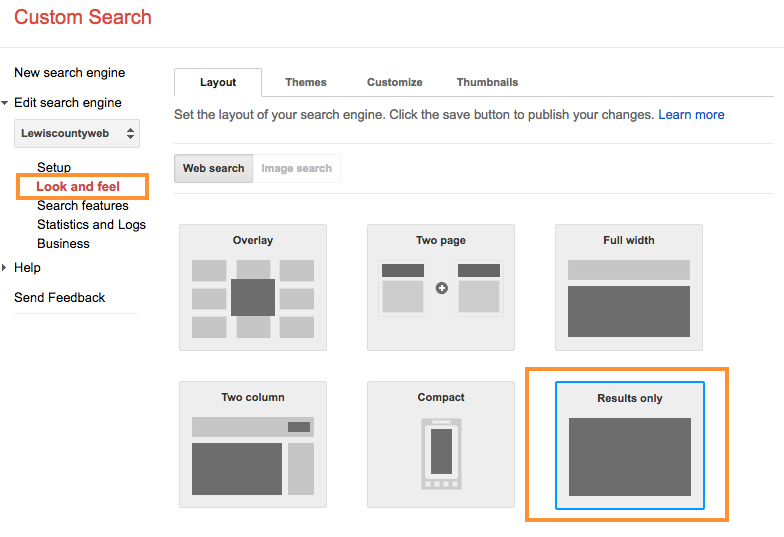
- Click the “Save” button.
Changes you make from within the Google Custom Search control panel will automatically update within WordPress once your Search Engine ID is saved within the WP Google Search plugin.
Working With the WP Google Search Widget
Now, your Google custom search is synced up with your WordPress site. To control the placement of the search field within your site’s layout, you will want to visit the Widgets section of your site.
- From your WordPress Dashboard, navigate to Appearance -> Widgets
- You should see an option for a WP Custom Search widget amongst the available widgets.
- Drag and drop the widget into your sidebar where you would like the search to appear.
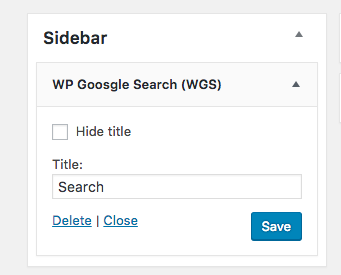
- Click “Save” to update the widget settings
- You should now be able to see the custom Google search appearing in the sidebar on the front-end of your website.

Customizing the Look of Your Search
Depending on which theme you are using and the overall appearance of your site, the default settings for the Google custom search may not fit with your aesthetic. Fortunately, there are a lot of options. If you don’t want to write custom CSS, you can easily tweak the appearance of your search from within the Google custom search settings.
- You can customize the appearance of the search field, button, and other elements within the Google Custom Search Control Panel.
- To change fonts, colors, and other visual components, navigate to the “Look and Feel” section on the sidebar.
- You can choose from a series of pre-made “looks” by selecting the “Themes” tab.
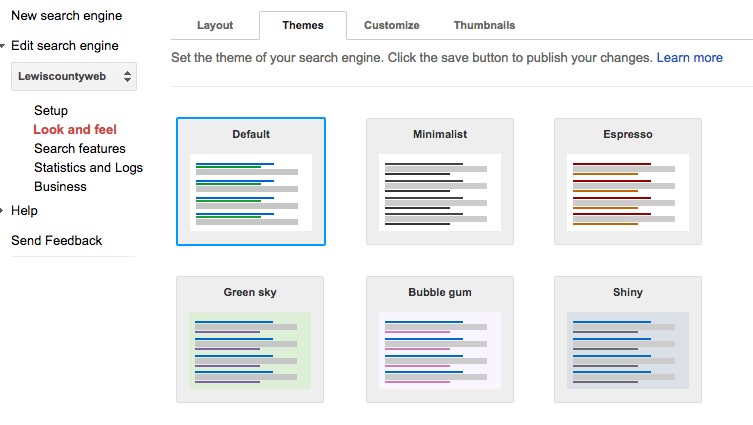
- Or, you can create your own custom look by selecting the “Customize” tab.
- From here, you can alter the settings to create an even more customized appearance for your search.
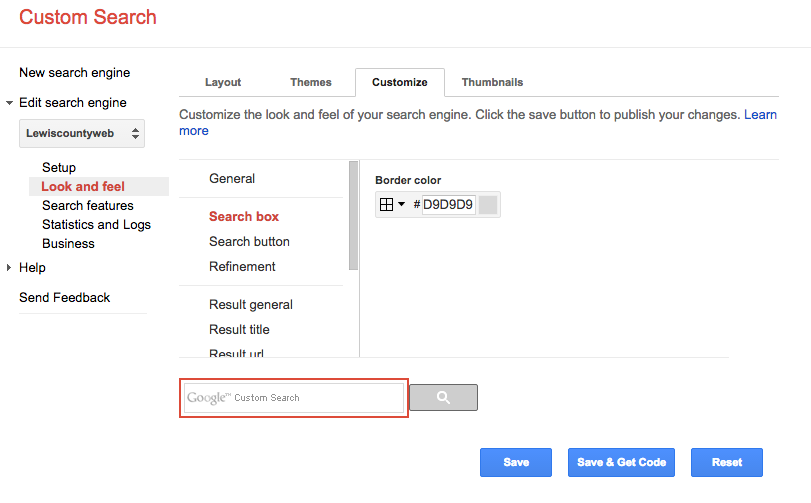
- When you have achieved the desired look, simply click “Save.” You do not need to copy and paste the code again. The changes will automatically be applied.
- If you are not happy any want to start over, you can always hit the “Reset” button to go back to the default look.
Adding a Google Custom Search in WordPress Manually
If you don’t want to use the WP Google Search plugin, there is also a way to incorporate a custom Google search manually. This method involves making changes to your WordPress theme, and it is highly recommended to use a child theme if you plan to take this route. It is always a good idea to make sure to backup everything before editing your theme’s core files!
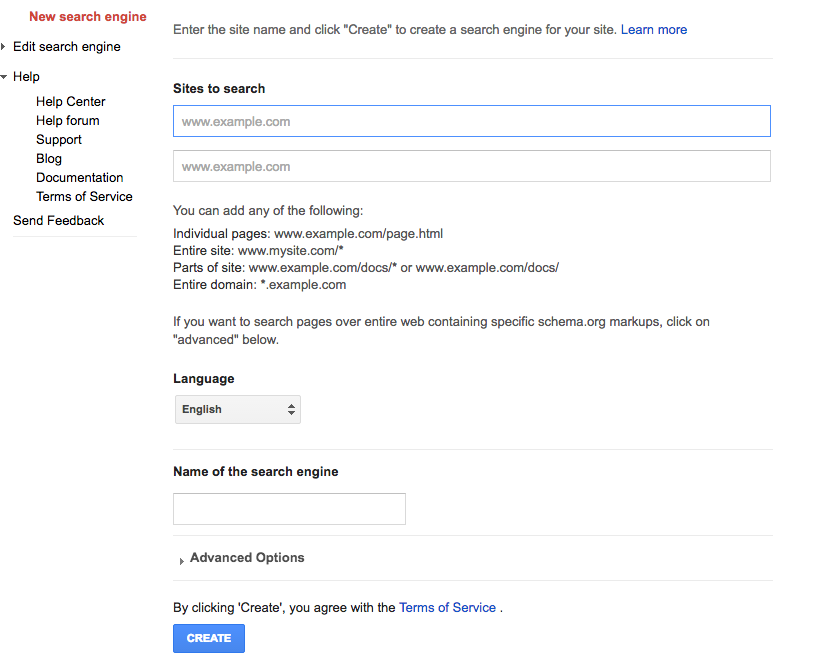
- To add a search manually, you will need to visit Google Custom Search and create a custom search engine by clicking the “Create a custom search engine” button.
- Enter your site’s URL into the “Sites to Search” field.
- Choose the language of your website.
- Click “Create” to continue.
- From here, you will want to click the button to “Get Code.”
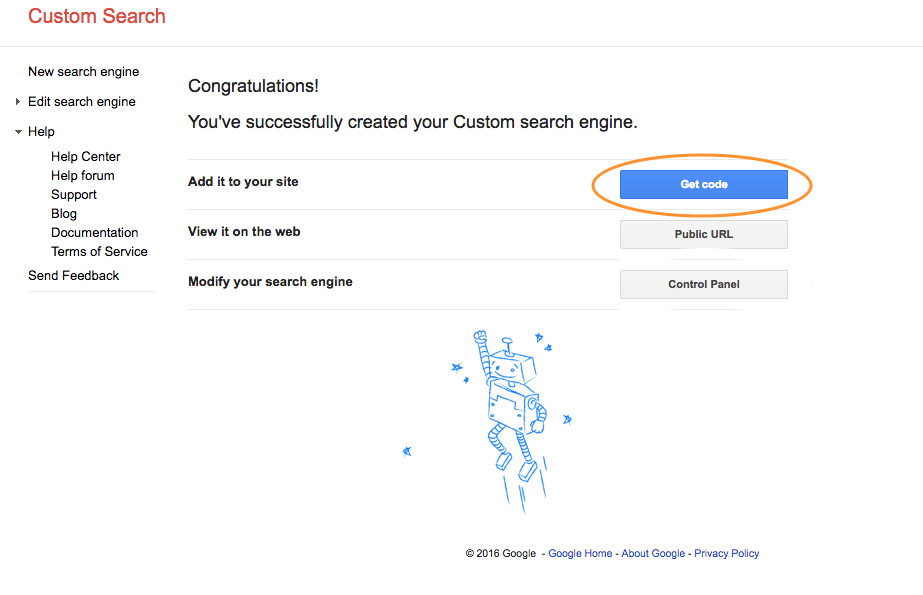
- Copy the code that is generated.
- You will now need to access your theme files by connecting to your site via FTP. If your webhost provides cPanel, you can also access your theme’s files through there using the File Manager.
- From your site’s root directory, navigate to wp-content/themes/your-theme
- Locate the file called searchform.php from within your theme folder
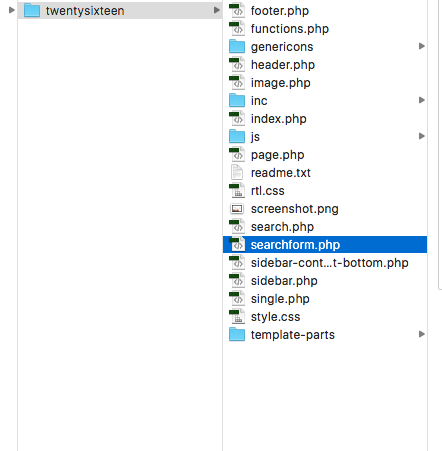
- Download this file
- Open the file, searchform.php, in the text editor of your choosing, and delete all of the contents
- Paste the code you copied from Google into the file, entirely replacing the file’s previous code.
- Save and re-upload the file to your site via FTP, making sure it is still saved in the same location within your theme’s file structure and with exactly the same name: “searchform.php”
- After you’ve completed this step, return to your WordPress Dashboard.
- The “Search” widget in your widgets area will have replaced the default WordPress search with your new custom Google search.
- Once you place your “Search” widget in the appropriate place on your site, you should see the Google custom search displaying on the front-end of your site in the corresponding location.
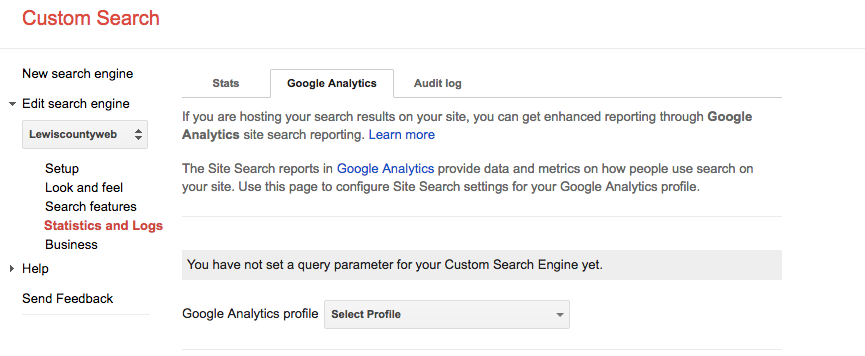
In addition to providing a more robust search engine, there are some other advantages to using a Google custom search on your WordPress site. You can easily integrate your search with Google Analytics to get enhanced reporting on how visitors to your site are using your search feature.
- To integrate your search feature with your Google Analytics account, simply navigate to the Statistics and Logs section on the sidebar.
- Click the “Google Analytics” tab
- Select your Google Analytics profile from the dropdown
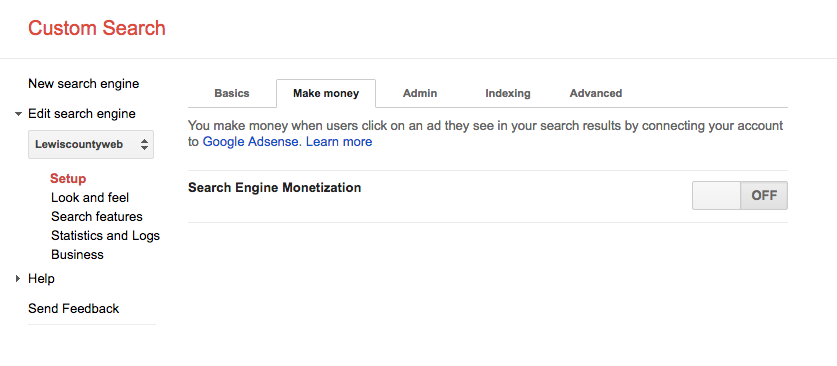
You can also choose to monetize your search feature by integrating your custom search with your AdSense account. Here’s how to do this:
- Choose the Setup option from the sidebar on the Google Custom Search page
- Select the “Make Money” tab
- Turn on “Search Engine Monetization”
You have now successfully added Google Custom Search to your WordPress site.
Does your WordPress site has default search or Google custom search? Let me know in the comments section.
Also read:


The is basic custom search. Looking for attractively designed custom google search for our homepage. Any comment will be helpful.