How To Create A Mega Menu In WordPress – Without Any Extra Plugins

Want to create a mega menu for your WordPress website?
WordPress Mega Menus helps to create a visually stunning and highly functional website that captivates your audience.
Websites with a lot of content usually have a complex navigation system. At such times, a mega menu can be a powerful asset.
Today, we’ll explore the art of creating a mega menu in WordPress without the need for additional plugins.
Say goodbye to the complexities of extra plugins and dive into our guide for creating a feature-rich mega menu.
Let’s begin!
What is a Mega Menu?

(source: Adidas)
A mega menu is a type of fly-out menu used in website navigation. This format offers a more extensive and visually rich menu structure and provides clean website navigation.
You can use this to create expansive, multi-column menus that display vast information, categories, and links in a structured and organized manner.
Features of Mega Menu
Implementing a mega menu helps you boost your website’s visual aesthetics and user engagement. Check out some more features of the mega menu:
1. Maximum Customization
The mega menu settings allow you to streamline multiple content levels from the main menu. Add images, icons, content sources, and more to meet your design visions!
You can easily arrange menu items, width layouts, highlight labels, and alignments. You can also choose from various colors and icons to create a visual masterpiece.
2. Simplified Navigation
Poor navigation often irritates visitors. A mega menu can streamline your content by adding items based on pages, posts, custom links, categories, and tags. You can showcase your latest articles, products, or announcements directly within the menu.
With the expansive layout, you can add multi-columns and submenus to create smooth navigation.
3. Multiple Positions and Styles
Create multiple menu styles to showcase your brand’s personality at both ends of the page. This dynamic feature allows you to create a captivating first impression with a unique header menu and ensures a seamless navigation menu at the footer.
4. Responsiveness
WordPress Mega menus are designed to be compatible across all devices to provide a smooth and consistent experience, regardless of browser preference.
5. Page Design
A mega menu surely helps to grab your visitor’s attention with visual aesthetics such as dropdown animations, images, icons, and multimedia elements, enhancing the overall appeal of the menu.
Traditional Menu vs Mega Menu
Traditional Menu: A traditional menu is a list of menu items that help users navigate a website. It can be limiting for sites with a lot of content.

The Google homepage has a traditional menu at the top of the page. The menu contains limited submenu items, such as Search, Maps, and Gmail.
Mega Menu: A mega menu is an expandable menu that displays many submenu items in a single column. It’s often used on content-heavy websites like eCommerce or blogs to organize information clearly.

Here’s an example of a clothing homepage with a WordPress mega menu at the top. The WordPress mega menu is organized into categories: Collection, Shop, Clothing, and others. Each category contains subcategories, such as Collection>Unisex, Men, and Women.
Check out the table below for a brief idea of the differences between the traditional and mega menus.
| Features | Traditional Menu | Mega Menu |
| Visibility | Displays a limited number of submenu items at once | Can display a large number of submenu items at once |
| Organization | Limited options for categorization | Maximum organization, including categories and subcategories |
| User experience | Simple and easy to use | More engaging and interactive |
| Complexity | Less complex to set up and maintain | Bit complex to set up |
| Accessibility | Easy to use | More streamlined access |
| Performance | Normal | Optimized for maximum performance |
Which Type of Menu is Right for You?
Choosing the right type of menu for your website depends on various factors, such as its size and complexity, your target audience, and your budget.
If your website is small and has a limited number of pages, a traditional menu will suffice. However, a mega menu for WordPress would be a better option if you have a large website with a lot of content.
How to Add Mega Menu on Your WordPress Website
This section will provide a step-by-step guide to creating the ideal mega menu for your WordPress website.
We will use the Cyberchimps Responsive Theme to build our mega menu. It offers features beyond those of standard themes.

Responsive Theme stands out as a cutting-edge WordPress theme crafted by Cyberchimps, a renowned WordPress development company with over a decade of industry presence.
Responsive is one of the best modern themes for creating any website. It’s free and actively installed on 30,000+ websites. The theme is SEO-optimized and provides various customization options to help create a stunning website.
For more details, check out a detailed review of Cyberchimp’s Responsive Theme.
Step 1: Downloading Responsive Pro From Cyberchimps Website
Head to the Responsive pricing page and choose the plan that suits your needs. Choose the right plan for you according to your needs and requirements and click on Buy Now.

Fill out your personal details, proceed with the suitable payment method, and click on Checkout.

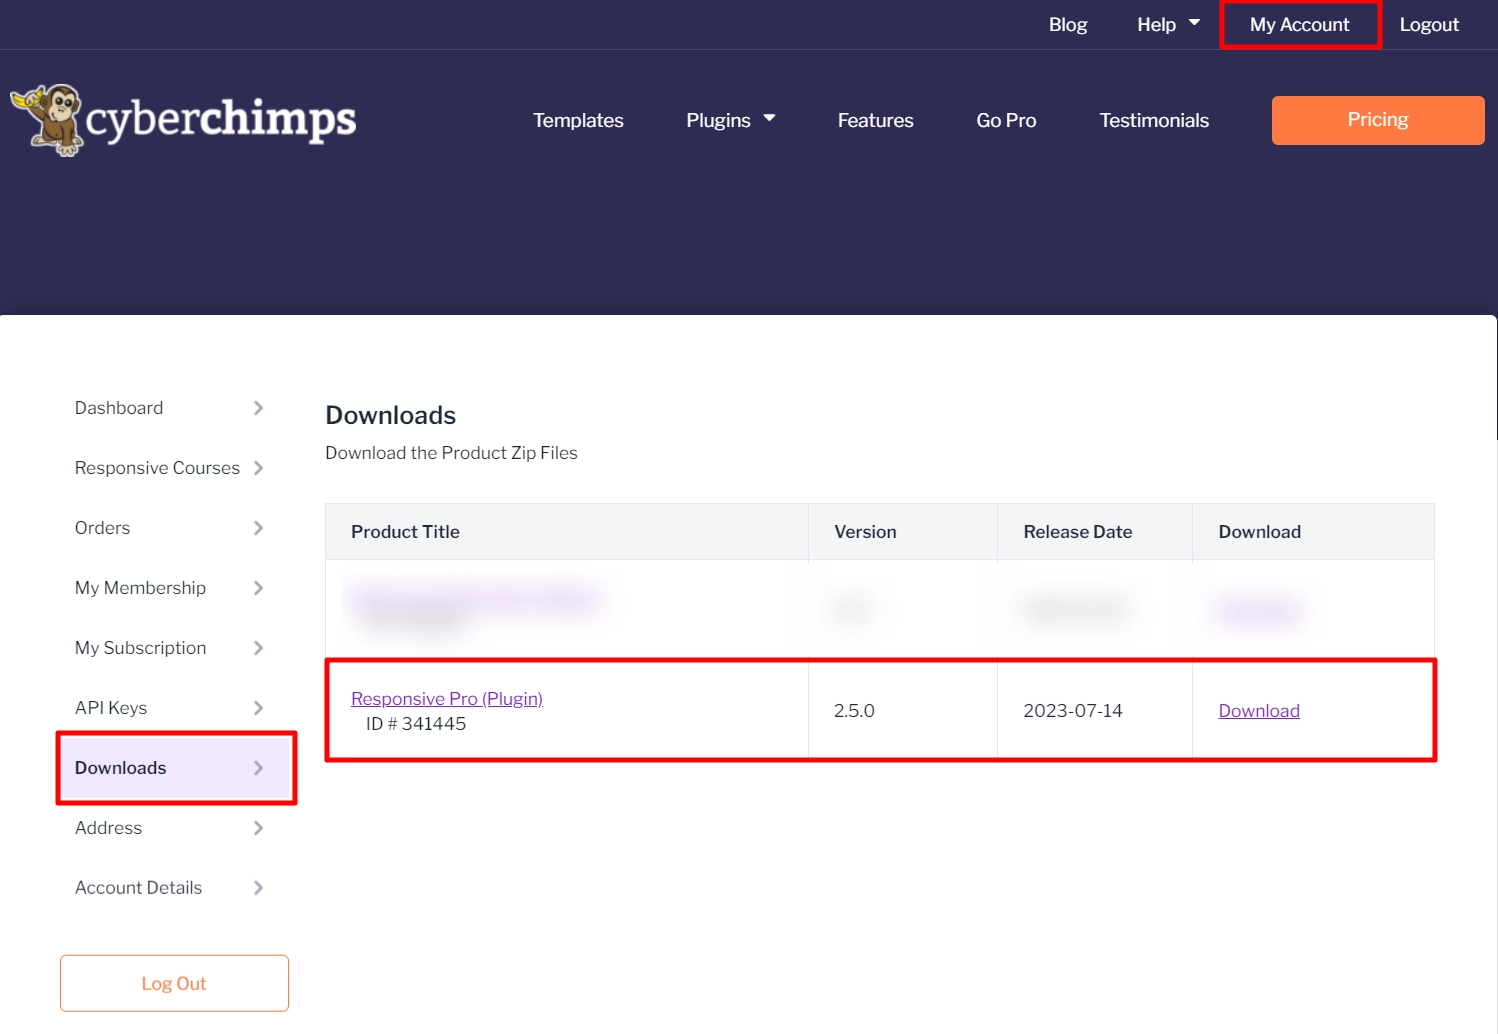
Once you have completed your payment process, go to Cyberchimps My Account > Downloads and download the Responsive Pro plugin zip file.
Step 2: Installing and Activating Responsive Pro
Once you have purchased and downloaded Responsive Pro, head to your WordPress dashboard and go to Plugins > Add New Plugin.

Select Choose File and upload the Responsive Pro Zip you downloaded.

After uploading, click on Install Now.

After installing, click on Activate Plugin.

Copy the Master API Key and Product ID from your Cyberchimps My Account page.

Navigate back to your WordPress dashboard and go to Appearance>Responsive Options.

From the Settings bar, enter the API Key and Product ID and click the Activate button.

Responsive Pro is now activated!
You’ll receive a pop-up on your WordPress dashboard to Install Responsive theme and Responsive Starter Templates. Click on the Install & Activate Now button.

Now that the prerequisites are ready, let’s create a mega menu for WordPress.
Step 3: Enabling the Mega Menu Block
From your WordPress dashboard, navigate to Appearance > Responsive Options.

Now, you’ll see the Home tab from the Responsive Theme dashboard. Scroll down to the Responsive Pro Features section and enable the Mega Menu block.

This will enable the mega menu feature on your website. Next, let’s explore how to add a mega menu for your website.
Step 4: How to Add a Mega Menu
Navigate to Appearance > Menus from your WordPress dashboard.

From the Edit Menus tab, click on Create a new menu.

Enter your menu name and click Create Menu.

Once your new menu is created, add new menu items.
In the pages tab, select all the pages you want to add to the menu and click Save Menu.

You can add menu items based on Pages, Posts, Custom Links, Categories, and Tags. Next, arrange the menu to create perfect navigation and click on Save Menu.

Customizing Mega Menu Settings
Select a parent item and click on Mega Menu Settings to enable customization. You can create parent columns with sub-menu items for proper categorization.

Switch on the Enable Mega menu button. Now, you can customize the submenus in this column.

To edit the sub-menu items, click the dropdown and select Mega Menu Settings.

This opens up the General Settings tab.

In the mega menu for WordPress settings, you can customize the following:
- Set as Heading: Allows you to designate a menu item as a main header, providing visual hierarchy in your mega menu.
- Hide Menu Label: This enables you to hide menu items from the menu.
- Disable Link: This option prevents a menu item from being clickable, making it non-functional while still visible in the menu.
- Menu Item Icons: You can add custom visual symbols (icons) to help users quickly recognize and understand the content or purpose of each menu item.
After customizing your mega menu settings, click on the Save Changes button.
You can customize other menu settings from your mega menu page, like Auto-add pages and Display location.
Once you’re done, click on Save Menu.

That’s it; you have successfully added a mega menu and can view your mega menu on your WordPress website.

To learn more about the Responsive mega menu settings and customization,, refer to the Mega Menu Documentation.
Examples of Mega Menus Done Right
In this section, we’ll explore real-world examples of websites that have successfully implemented mega menus to significantly enhance user engagement and navigation.
eCommerce Giants: See how Nykaa has leveraged the mega menu feature to categorize its products.

We can observe how visually appealing images and strategic placements of icons can contribute to a seamless shopping experience.
News and Media Outlets: Mega menu feature used in media channels.

The CNB website has used a mega menu to display vast content, from breaking news to specific topics. Mega menus improve accessibility and keep users engaged and informed.
Common Mistakes to Avoid When Creating a Mega Menu
We understand that using Responsive Pro is easy and simple, but here are a few mistakes that you can avoid while building your mega menu:
- Overloading Information: Showcasing more information can lead to a cluttered mega menu. Prioritize essential information, clean design, and grouping your content.
- Ignoring Responsiveness: Optimize your mega menu for all types of screens to maintain a smooth user experience.
- Poor Visual Hierarchy: Create a visually appealing hierarchy within the mega menu to avoid confusion for your visitors.
This ensures the users have a positive experience while navigating the website.
FAQ
Yes, you can create a mega menu in WordPress without coding using the Responsive Theme that offers built-in tools for customizing the mega menu.
The Responsive Theme premium version allows you to add background images, icons, and other elements to improve your mega menu’s visual appeal and engagement.
Not necessarily. While some themes, like Responsive Theme, come with built-in mega menu support, others may require additional plugins. Check your theme’s documentation to see if mega menu functionality is available.
Key Takeaways
In conclusion, mega menus unleash creativity and transform your site’s navigation, making it a visually stunning experience.
Furthermore, using a mega menu on your website helps you to captivate your visitors and boost engagement.
As you implement your mega menu for WordPress, test and gather feedback to improve your website’s navigation.
We hope this article has helped you understand how to add a mega menu WordPress to your WordPress site.
Enjoyed exploring this topic? Check out our other insightful articles:
- How To Build A Website With WordPress
- How To Add Privacy Policy In WordPress
- How To Add Blog Posts To Pages In WordPress
Excited to build a website? Use the Responsive Theme to create a stunning website!

Leave a Reply