How to Install WordPress
It fascinates me how in the 12 years since its inception, WordPress has developed over 40,000 plugins, has 120 languages in use and as per 2nd May 2016, with 39% of the world preferring it, is the most popular Content Management Software (CMS).
Do you want to be an addition to the 76.5 Million websites that rely on WordPress?
WordPress is not only the most popular CMS but it is also the most user friendly of all the CMS available in the market. Every WordPress web hosting company will let you install WordPress in a few clicks which will take merely five minutes.
We will provide a complete WordPress installation tutorial for beginners as well as advanced users.
For Starters, we will present how to install WordPress using Softaculous. For intermediate users, we will make you aware how to install WordPress manually. Last but not the least, for our developers and designers, we will show you how to install WordPress on a Multiple Networks.
Wondering How to Install WordPress?
Here are some Prerequisites for Installing WordPress
Before you start the installation, these are the few things which are mandatory:
- Web Browser of your Choice
- Entry to your Web Server (using FTP or shell)
- An FTP Client
- A Text Editor
Things You Need to Do to Install WordPress
Start your installation by:
- Making sure that the minimum requirements to fulfill the installation are fulfilled.
- Downloading the latest version of WordPress.
- Unzipping this file to a folder on your hard drive.
- Creating a secure password for your Secret Key.
- Keeping this web page open so that it’s convenient during the installation.
Approach 1- How to Install WordPress using Softaculous
Softaculous is one of the most well received auto-installer script. You can install popular web applications like WordPress in just a few clicks.
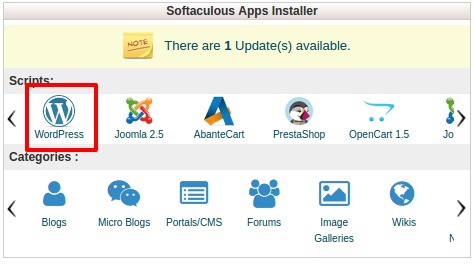
Simply login to your cPanel account and look for WordPress icon under Scripts.
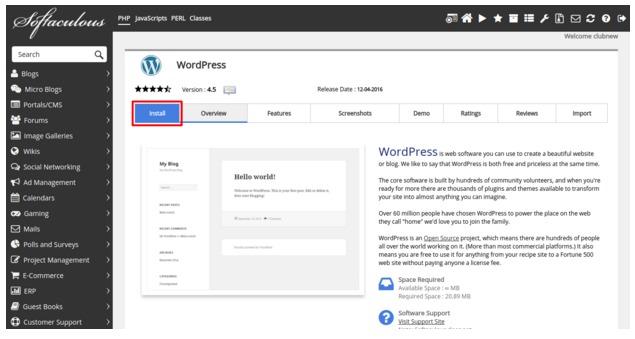
After going through the WordPress overview, you need to click on the Install tab if you wish to continue.
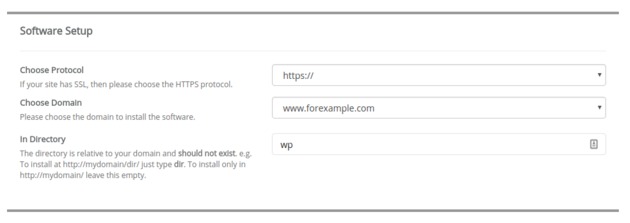
Softaculous will now ask you to provide information regarding your desired location of WordPress. You need to choose http:// or http://www. as protocol.
In case of SSL and HTTPS in your website, you can select https:// or https://www. as protocol.
Thereafter, select the domain name where you want to install WordPress. In most cases, users install WordPress in their domain’s root directory, like example.com. In that case, you need to make sure that the ‘In Directory’ field is blank.
Scroll down a little, and you will see the site settings section.

For further configuration, you have to provide a title and description for your WordPress site. They are easily changeable from your WordPress admin area post installation.
Next, you need to choose an admin username, password, and email address. Softaculous can also by default fill in the username and password fields for you. It will use a non-dictionary word for username and a strong password.
You can change them if you want so that they are easy for you to remember. See our guide on the best way to manage passwords for WordPress starters to learn how you can manage strong passwords easily.
Do not make the mistake of entering the wrong email address in the admin field. In case you forget your password, this is where WordPress will send the reset link.
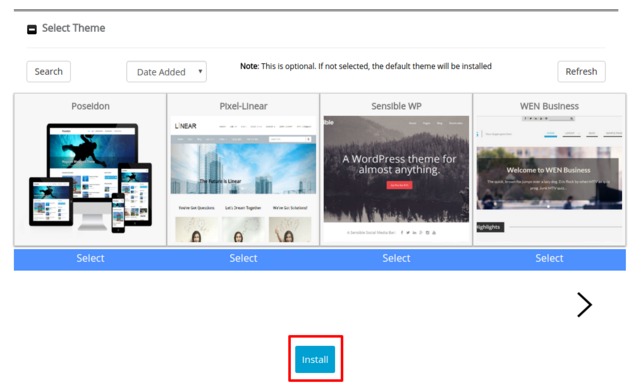
For installing, you can now click on the install button.
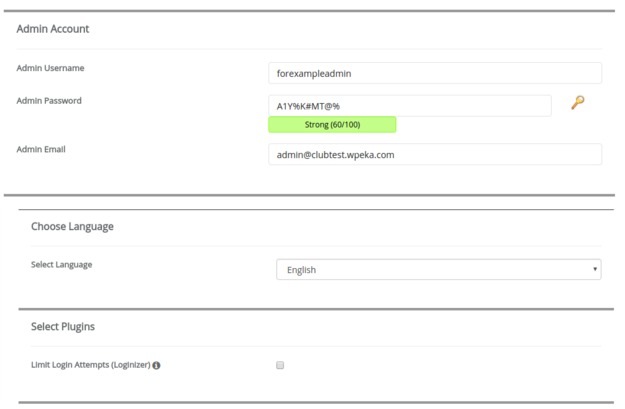
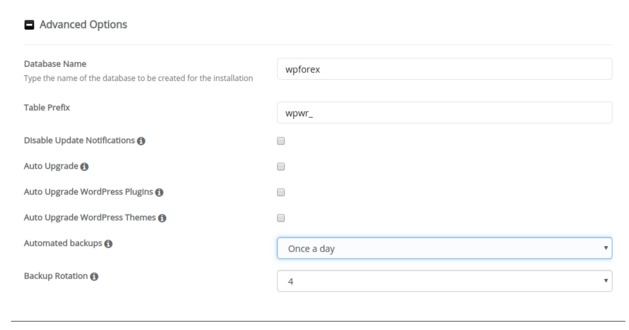
The settings you provided will now be used for the installation process. It will not take more than 2 minutes to install WordPress.
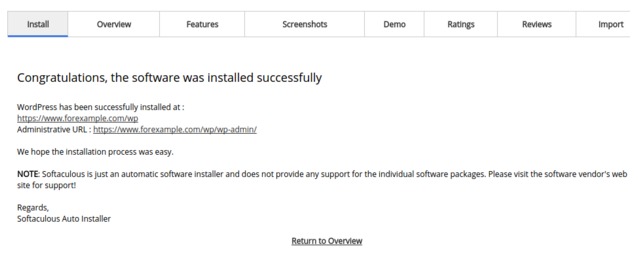
You will see a success message after the installation is finished. It will also show you a link to your website and another link to your WordPress admin area.
Approach 2- How to Install WordPress in 5 Minutes?
For those who are already familiar with performing such installations, here’s the quick version of the instructions. Click here for detailed instructions.
Step 1: If you already haven’t, download and unzip your WordPress package.
Step 2: Generate a database for WordPress on your web server, as well as a MySQL (or MariaDB) user who would have all privileges for accessing and tweaking it.
Step 3: (Optional) Rename ‘wp-config-sample.php’ to ‘wp-config.php’, then edit the file (see Editing wp-config.php) and add your database information.
Step 4: Select a desired location on your web server and make the WordPress upload.
- In case you want to merge WordPress into the root of your domain (e.g.http://example.com/), upload or move all the data of your unzipped WordPress directory (excluding the WordPress directory itself) into the root directory of the web server.
- Create the blog directory on your server and upload contents of the unzipped WordPress package to the directory using FTP, in case you want to have your WordPress installation in its own subdirectory on your website (e.g. http://example.com/blog/).
Note: In case the FTP client has an option to convert filenames to lowercase, make sure it’s disabled.
Step 5: Run the WordPress installation script by accessing the URL in any web browser. This should be the URL where you uploaded the WordPress files.
- If you’ve installed WordPress in the root directory, visit: http://example.com/
- If you’ve installed WordPress in its own subdirectory called blog, for example, visit: http://example.com/blog/
That’s it! WordPress should now be installed.
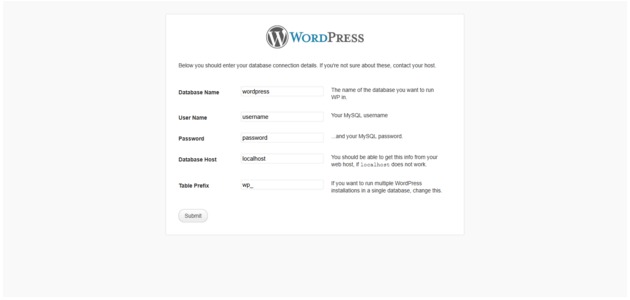
Finishing installation
The following screenshots show how the installation progresses.
Notice that in entering the details screen, you enter title of website, your user name, your choice of a password (twice), and your e-mail address.
You also have option of checking a box to appear in search engines like Google and Technorati.
Leave the box checked if you would like your blog to be visible to everyone, including search engines.Uncheck it if you want to block search engines, but allow normal visitors.
Note all this information can be changed later in your Administration Panels.
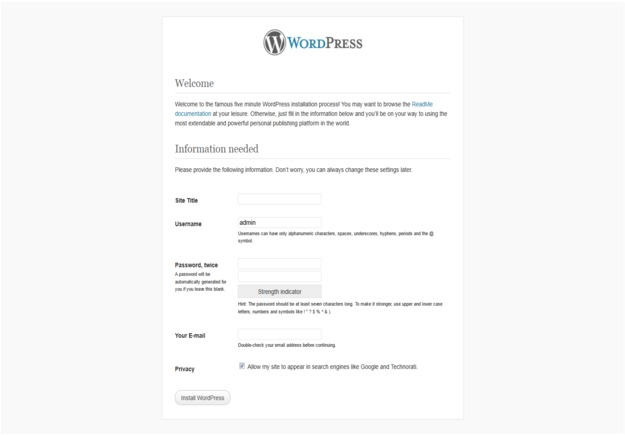
Enter site, login, and email:
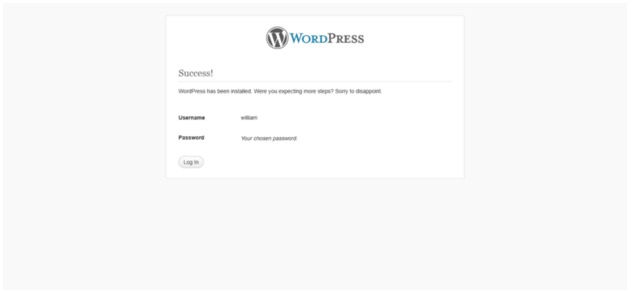
Approach 3- How to Install WordPress on Multi-sites?
Multi Site feature
This feature is conducive for producing multiple blogs, to create what was referred to be a network of sites using WordPress. This feature was implemented by merging WordPress MU into the core at Version 3.0.
Multiple Blogs Through Multiple Installs
In case you need multiple WordPress cases, you must actually install each WordPress as a separate entity. There are two types of number of databases in the System architecture.
- Single database installation. The database manages all site’s information.
- Multiple databases installation. Each database manages specific site’s information.
Multiple Databases
You’ll need a separate MySQL database for each blog you plan to install. If you have not yet created these,
The wp-config.php file will vary for each installation. The lines to change are:
| define(‘DB_NAME’, ‘wordpress’); // The name of the database define(‘DB_USER’, ‘username’); // Your MySQL username define(‘DB_PASSWORD’, ‘password’); // …and password |
To run the installation, you will have to upload each wp-config.php file to its specific root/installation directory.
Single Database
From the multiple databases solution described above, the wp-config.php file will vary for each installation. However, in this case, only a single line will be unique to each blog:
| $table_prefix = ‘wp_’; // example: ‘wp_’ or ‘b2’ or ‘mylogin_’ |
By default, WordPress assigns the table prefix wp_ to its MySQL database tables, but this prefix can be anything you choose. You can use more than one and generate unique identifiers for each blog in your database. For example, let’s say you have three blogs to set up, with the names Main, Projects and Test. You want to substitute the prefix wp_ for each blog’s wp-config.php:
Main blog:
| $table_prefix = ‘main_’; |
Projects blog:
| $table_prefix = ‘projects_’; |
Test blog:
| $table_prefix = ‘test_’; |
You can easily use a prefix of your own making. Those provided here are for example purposes only.
Upload each wp-config.php file to its specific root/installation directory, and run the installation.
Multiple Databases, Same Users
It is possible for you to use the same user base with all your blogs on the same domain, by defining the CUSTOM_USER_TABLE and optionally the CUSTOM_USER_META_TABLE constants to point to the same wp_your_blog_users and wp_your_blog_usermeta tables.
Create A Network

A collection of sites which share the same WordPress installation is a multisite network. They can also share plugins and themes. All the individual sites in the network are virtual sites. I.e. they do not include their own directories on your server. They do have separate directories for media uploads within the shared installation but do have separate tables in the database.
Before You Begin
In comparison with a typical single WordPress installation, a network installation has additional considerations.
A decision will have to be made on whether you want to use subdomains or subfolders and how you want to manage them. Installing themes and plugins is different: for example, each individual site of a network can activate both, but install neither.
Step 1: Prepare Your WordPress
When you create a network, your existing WordPress site will be updated. Except for the case of a fresh install and you have nothing to lose, please backup your database and files.
Verify that Pretty Permalinks work on your single WP instance.
Keep all your active plugins deactivated. You can reactivate them after the network is created.
If you plan to run WordPress out of its own directory, do that before activating Multisite.
Step 2: Allow Multisite
To enable the Network Setup menu item, you must first define multisite in the wp-config.php file.
Once you open wp-config.php and add this line above where it says /* That’s it, stop editing! Happy blogging. */.
In case that doesn’t appear anywhere, you can add the line somewhere above the first line that begins with require or include:
| /* Multisite */ define( ‘WP_ALLOW_MULTISITE’, true ); You will need to refresh your browser to continue. |
Step 3: Installing a Network
From the previous step, Network Setup item in your Tools menu will be enabled. Use that menu item to go to the Create a Network of WordPress Sites screen.
See an example of the Create a Network of WordPress Sites screen, look at Administration >Tools > Network Setup. The screen does not look exactly the same in all circumstances. The example shown is for an installation on localhost, which restricts the options available.
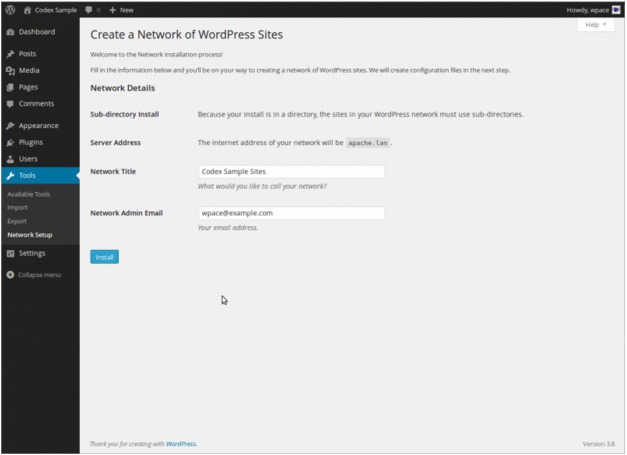
Addresses of Sites in your Network
You can choose between sub-domains and sub-directories, except when your existing settings restrict that choice.
You must have to choose between those. Post installation, you can reconfigure your network to use the other choice. But this step might not be easy to configure.
You only need wildcard DNS for on-demand domain-based sites, despite the advice that may be on the screen.
- Sub-domains — a domain-based network in which on-demand sites use subdomains
- Sub-directories — a path-based network in which on-demand sites use paths
Network Details- These fields are by default present but you can make changes.
- Server Address: The domain of the URL you are using to access your WordPress installation.
- Network Title: The title of your network as a whole.
- Admin E-mail Address: Your email address as super admin of the network as a whole.
Double-check the details and press the Install button.

- Does your page look gibberish towards the end. The source has a lot of “<?php ?>” tags.
In case the <?php ?> tags are being directed to the browser, it is an indication that your PHP is not working properly. PHP codes are supposed to be carried out before the server sends the resulting HTML to your web browser. (Thus the name, preprocessor.) Check your web server requirements are met to run WordPress, that PHP is installed and configured properly, or ask your system administrator or hosting provider for guidance on this.
- An Error connecting to database message is always flashed but I’m sure my configuration is correct.
The initial resort is to check your MySQL/MariaDB password manually. In case you can get MySQL/MariaDB via shell, try issuing:
| SET PASSWORD FOR ‘wordpressusername’@’hostname’ = OLD_PASSWORD(‘password’); |
If you have been using an older version of MySQL prior to 4.1, use PASSWORD instead of OLD_PASSWORD. In case you don’t have shell access, you can register the above into an SQL query in phpMyAdmin. If you fail that, you may need to use your host’s control panel to reset the password for your database user.
- ‘Your PHP installation appears to be missing the MySQL extension which is required by WordPress’ message is always popped up but I’m sure my configuration is correct.
Verify that your setting of your web-server is precise and that the MySQL plugin is getting loaded correctly by your web-server program. This issue is sometimes critical and needs everything in the path all the way from the web-server down to the MySQL/MariaDB installation to be cross checked to be fully functional. In case, the configuration files or settings are improper, this issue is arises.
- My MP3/image uploads aren’t working.
In case you are using the Rich Text Editor on a blog that’s installed in a subdirectory, and drag and drop a newly uploaded image into the editor field, the image may disappear in a few seconds. This is due to a problem with TinyMCE (the rich text editor) not getting enough information during the drag operation to construct the path to the image or other file correctly. The solution to this is to NOT drag uploaded images into the editor. Instead, click and hold on the image and select Send to Editor.
- I see a directory listing rather than a web page.
By default, the web server needs to be told to view index.php. In Apache, use the DirectoryIndex index.php directive. The best option is to create a file named .htaccess in the already installed directory. Now, place the directive there. Another option is to add the directive to the web server’s configuration files.
6. There are a lot Headers already sent errors. How do I fix this?
The only thing you need to do is to introduce a syntax error in editing wp-config.php.
- Download wp-config.php (if you can’t access shell).
- Open it in a text editor.
- Check that the first line contains nothing but <?php, and that there is no text before it (not even whitespace).
- Check that the last line contains nothing but ?>, and that there is no text after it (not even whitespace).
- If your text editor saves as Unicode, make sure it adds no byte order mark (BOM). Most Unicode-enabled text editors do not inform the user whether or not it adds a BOM to files; if so, try using a different text editor.
- Save the file, upload it again if needed, and reload the page in your browser.
Feel free to comment about the methods to install WordPress that you’ve tried and would want the fellow installers to explore.
Check out the latest WordPress.com’s Calypso App

Leave a Reply