How to Manage 404 Errors on Your WordPress Website

If you’re looking to improve your website’s user experience, dealing with your broken links is a good place to start. 404 errors are great hindrances and annoyances to visitors (admit it — you hate them, as do I).
Getting rid of those errors is a great way to boost user engagement on your website.
What Are 404 Errors?
A 404 error basically means that the website you’re trying to connect to is working, but the particular page that you’re looking for can’t be found.
On a WordPress website, any link that doesn’t have any content on it will redirect to a 404 error page.
What’s the Problem with 404 Errors?
Contrary to popular belief, having 404 errors won’t affect your ranking in the SERPs. However, they do give your website a bad first impression; if a user clicks one of your site’s broken links to only be greeted by your 404 screen, he’s not likely to stick around for very long, is he?
Every user that lands on a 404 error screen is an instantly unhappy potential client … and you never want to make your leads unhappy.
What Causes 404 Errors?
The most common cause of a 404 error is a change in your permalink structure.
Every time you change your permalinks, you’re changing the URLs of the majority of pieces of content existing on your site.
Your internal links will be updated to reflect this, but any inbound links you have won’t be — these links will continue to point at your content’s old URL. Any user that clicks on one of those broken inbound links will be taken to a section of your site that no longer exists, which brings up a 404 error.
Similarly, if you regularly delete outdated content on your site, users might still try to access it through a non-updated inbound link. No prizes for guessing which page they’ll be taken to.
These causes of 404 errors are completely avoidable, but not all are.
For instance, typos happen. If a third-party webmasters mistypes your URL when linking to your site, users will be sent to a page that simply doesn’t exist — there’s nothing you can do about that (aside from emailing him about the link).
Preventing 404 Errors
You won’t be able to prevent all 404 errors, but we can keep them to a minimum by preventing the ones we do have control over.
Head over to Settings > Permalinks in your WordPress dashboard.

From here, you can set how you’d like your permalinks to appear; here are a few examples:
- http://yoursite.com/post-name
- http://yoursite.com/?p=123
- http://yoursite.com/2014/05/16/post-name/
If you’d given this some thought right from the start, you’ll never have a reason to change your permalinks. That eliminates one of the most common causes of 404 errors.
Before deleting any content — another other common cause of 404 errors — ask yourself if it really needs deleting. Most content does no harm sitting there in the background, and if necessary you can remove all internal links to the piece.
If you decide it does need to be deleted, consider deleting the content but keeping the page — you could write a quick note as to why the content no longer exists, and point users to more helpful content.
WordPress Plugin for 404 Errors
The best plugin to deal with 404 errors is Redirection.
Not only will the plugin alert you to the 404 errors that exist on your site, it will also help you remove them.
It does this by automatically adding a 301 redirect page to any content that changes its URL — when a user visits the old address they’ll automatically be taken to the new one — meaning the 404 error page is never seen. You can set a 301 redirect for the URL of a page you’ve deleted too.
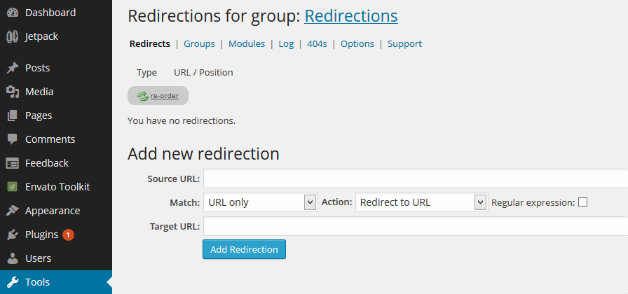
You’re even able to redirect where users coming from an external link are taken — if a valuable link that drives a lot of traffic breaks, you can specifically set where you want users who click on the link to be taken.
Tada. 404 errors solved.
If you’ve got any additional tips for dealing with 404 errors, let us know in the comments section below!

Leave a Reply