Ultimate Guide About Images in WordPress-I
How to Add Images in Your Blog?
As a blogger, you have written your perfect article. You wonder, blogging is all about words and writing great content, then why bother about images?
Here’s Why!
As per statistics, less than 50% visitors read the complete article. More than 90% of readers view all the images in your article.
Articles with images and visual content are more likely to be scrolled till the bottom than plain text articles.
It’s often said that “A Picture is worth a Thousand Words”. I believe that to begin your post with a great looking image is like an icing on the cake. A recommended way is to inter-space your content (add 1 image every two paragraphs) with relevant images and impel the user to finish reading it.
Ever wondered : How does WordPress manage images and organizes media library on your blog effectively?
We get to you a detailed guide of how images can be managed to make your WordPress blog a reader’s paradise.
To summarize, the following areas are covered in the 3 posts on Images:
- Uploading Images – There are various means of adding images to your posts and pages like from your computer, the network or the Media Library.
- Image Settings – Give a caption or a title to your uploaded images. Basic information like the permanent link, dimensions of image and the file type can be included.
- Editing Images – You can use this guide to rectify the image which is either upside down or a little too big for your page. It will help you to crop, rotate and scale your images.
- Galleries and Slideshows – Show all your images either in a gallery or slideshow.
- Image Optimization – When you decrease the file size for images before you insert them, uploads and pages will load faster.
- Troubleshooting – Tips on what to do if you are having problems in uploading pictures or organizing images.
- Finding Free Images and other Media – Looking for a public domain or a copyleft image for your website? Here are some suggestions on where to find them!
Read on to know all the do’s and dont’s while posting an image in your blog!
Accepted Image file types
The following image types can be uploaded in your WordPress blogpost:
- .jpg/.jpeg
- .gif
- .png
Maximum file size
Bigger the image, longer is the time taken to upload them! To upload high resolution and higher size images (more than 1GB) successfully, you would have to tweak your server configuration for PHP Max Sizes, POST Content Sizes.
Steps to Add Images in WordPress!
- Decide the desired position where you would like to insert images.
- You will see an ‘Add Media Button’ above the ‘Post Editor Toolbar’. On clicking the ‘Add Media Button’ you’ll see the ‘Insert Media box’.
- From this box, you can either upload a new file or use an existing file from the Media Library. To upload an image, click the Select files button and add the image you like.
- You will find this uploaded image in the Media Library. By right clicking on this box, you’ll see the attachment details for this page. From this tab, you can change the Title, Caption, Alt text and Description.Also, choose the alignment of the image (such as center, left or right), where the inserted image should link to, the actual URL of the image and the size of the image.
- After checking the checkbox on the image, click the Insert into Post button. This will make the image to appear in your post.
- Two boxes will appear in the upper lefthand corner of the image, once you click on it. The first is the image icon. On clicking on the image icon, another box will open for editing the image. From here, you can resize the image based on percentages or you can change the title, alternative text, the caption and link URL. You can also select this image either to link nowhere, or to link to the actual image file.
- If you click the advanced settings tab, detailed information like the URL of the image file hosted on your website, actual height and width of the image in pixels, the CSS Class,styles and image properties that add padding to the image.
- Return to the image in your post. The next icon in the upper left corner will delete the image out of the post, if you want to.
- If you click the Add Media button again, you’ll see the same insert media box. On the left side of this box, you’ll see two options; to create a gallery and set the featured image. On having more images in your media library, you can add an entire gallery of images into the post.
The featured image of the post is sometimes used by your WordPress theme. Go ahead and choose this image as our featured image and return to the post editor. Now, you can preview the post and see that our image has been added.
Image Settings
Add captions, change the alignment of your images, link your images to URLs etc. from the Image settings.
While uploading an image, these options will appear on the right-hand side of the media uploader.
Let’s walk through what each of the controls has to offer.
1. Attachment Details
Some features of the your image will appear at the top, next to the thumbnail:
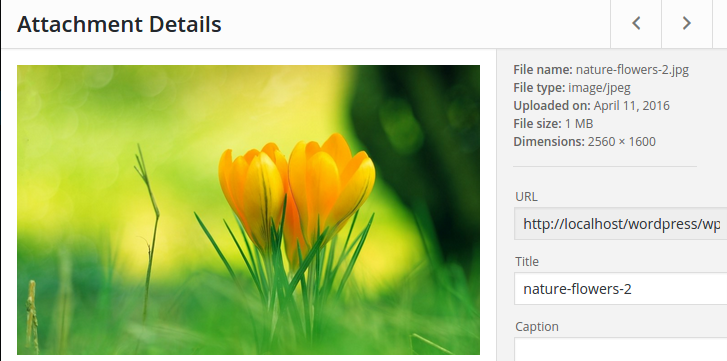
Information like image title, date of the image upload, file size and dimensions.
The user can also be given an Edit Image link which will take him to a screen where he can edit the image (see Image Editing), and a Delete Permanently link will come in the picture when you decide to delete the image from the post.
Below this, you’ll see the image URL, which is the permanent link where the image is stored on your site which cannot be changed.
Below that is the Title of the image which can be edited and changed to whatever you like.
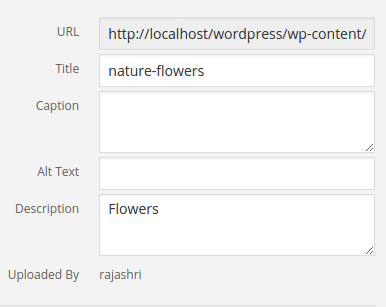
Next, you can enter a caption to display below your images in the Caption field.
Note: The manner in which the caption displays and whether image has a border or not, is a function of the theme you are using. In case you have the Custom Design upgrade, you can change the appearance of images using CSS.
In case of slow loading sites or for readers using screen readers and other assistive technology, the Alt Text controls what text replaces the image. It is advised to use a simple description of the image.
An optional description of the image that will be displayed on the image’s attachment page (if you choose for the image to be linked to its attachment page) can be added from the Description field.
Finally, the display name of the user who uploaded the image is shown.
2. Attachment Display Settings
There can be a number of settings which can control how the image would be displayed in your post.
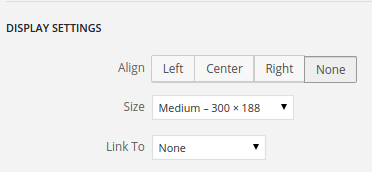
You can align your text to be left- or right-aligned, with your text wrapping around it, or center-aligned with the text breaking above and below it with the Alignment field. You can also choose ‘None.’
The ‘Link To’ option controls where a visitor is taken if they click on the image:
- Media File opens the image file on its own tab.
- Attachment Page opens the image on its own page in your site, where its title and description are displayed, and where readers can leave comments and use sharing buttons on the individual image itself (if comments and sharing are enabled on media files).
- Custom URL allows you to choose the image links; for example, you can attach the image to a specific page of your site when clicked.
- If you don’t want the image to be clickable at all, select None.
Finally, you can choose the various sizes at full-size, medium, large or as a thumbnail with the Size option. The specific sizes that are applied by the medium, large, and thumbnail settings can be chosen in Settings?Media.
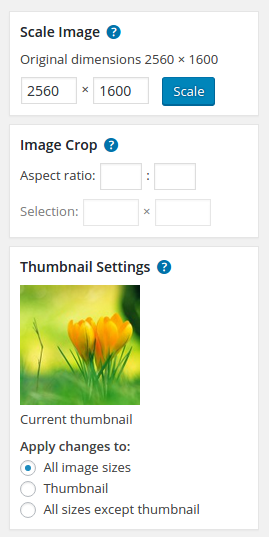
3. Scale Image
This option lets you proportionally scale the original image. It is best advisable, scaling should be done before you crop, flip, or rotate. Images can only be scaled down, not up.
Original dimensions 2560 × 1600
4. Image Crop
Drag the desired portion of the image and select it to crop the image.
Crop Aspect Ratio
The relationship between the width and height is called Aspect Ratio. You can preserve the aspect ratio by holding down the shift key while resizing your selection. Use the input box to specify the aspect ratio, e.g. 1:1 (square), 4:3, 16:9, etc.
Crop Selection
Once you have made your selection, you can adjust it by entering the size in pixels. The minimum selection size is the thumbnail size as set in the Media settings.
5. Thumbnail Settings
You can edit the image while preserving the thumbnail. For example, you may wish to have a square thumbnail that displays just a section of the image.
6. Images Within Posts
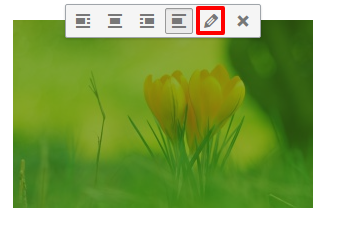
Already uploaded image can also be edited from the visual editor of a post or a page. To do this, click on any image in the visual editor and select the Pencil button that appears (you can select the “X” button in case you wish to delete this):
An Image Details PopUp appears with many of the same options discussed above:
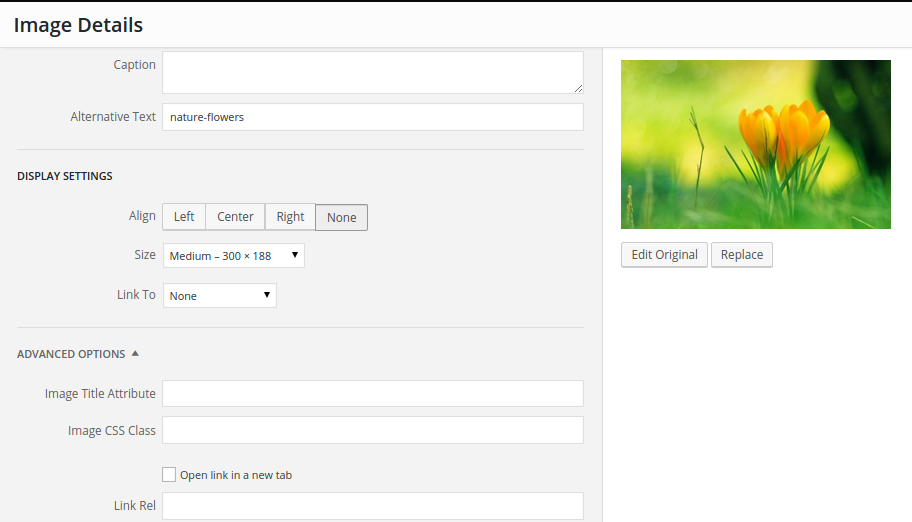
You’ll also see two buttons below the image:
Edit Original takes you to a screen where you can make various changes like rotating, scaling, or cropping the image (see Image Editing), and Replace lets you choose a different image altogether from the Media Library.
Advanced Options
Finally, there are some Advanced Options available:
Note: These advanced options will only appear when you edit an image directly from a post or page.
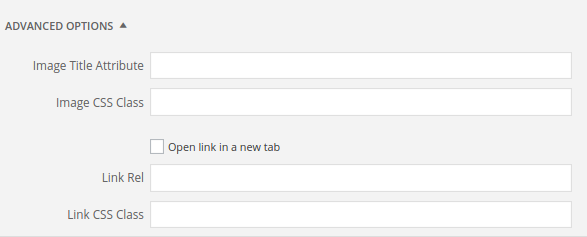
- Image Title Attribute will control the Tooltip display message when the header hovers over the image.
- Image CSS Class CSS classes can be added to an image.
- Open link in a new window/tab allows the image (or the link where the image leads) to open in a new tab or window.
- Link Rel manages the image link’s rel attribute, to add nofollow amongst other things.
- Link CSS Class allows you to include CSS classes to the image link (this is an advanced option; to get started with CSS, see CSS Basics).
Where are Images Stored?
All the images are generally stored in- wp_content/uploads.
WordPress comes with a built-in system to manage your media uploads like images, videos, music, documents, etc. This system allows you to upload, manage, edit, and delete files from your WordPress media library.
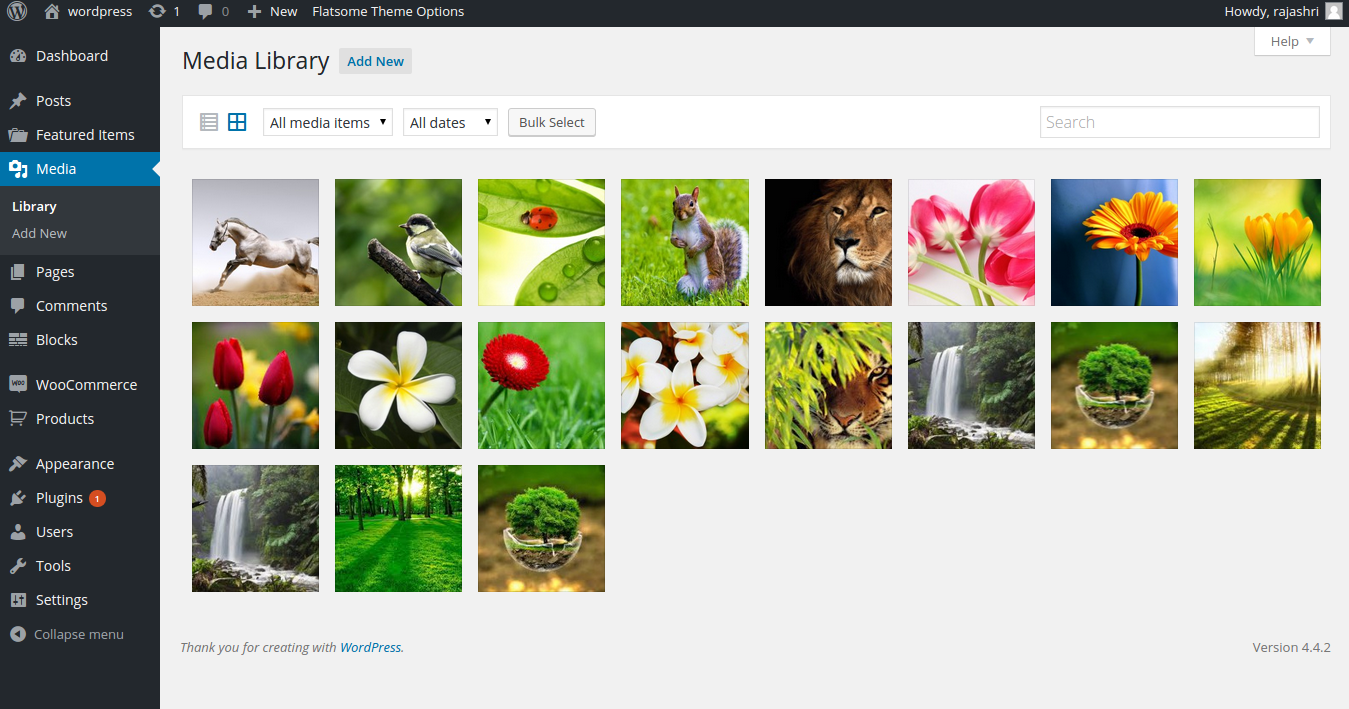
The default path where WordPress stores all your images and media uploads in /wp-content/uploads/ folder on your server.
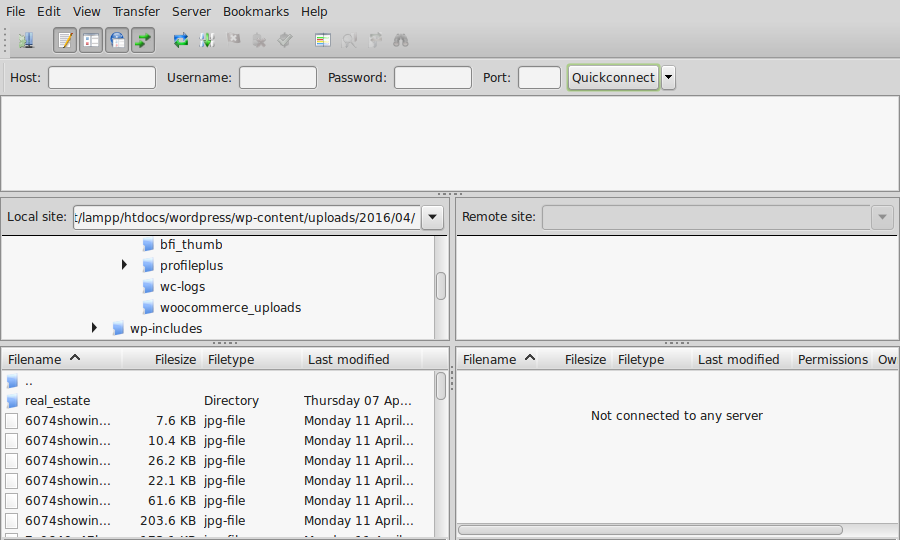
Year/Month pattern is followed to organize all uploads.
For example, all your media files uploaded in Dec 2015 will be stored in:
/wp-content/uploads/2015/12/
You can connect to your WordPress site using FTP client to view these folders.
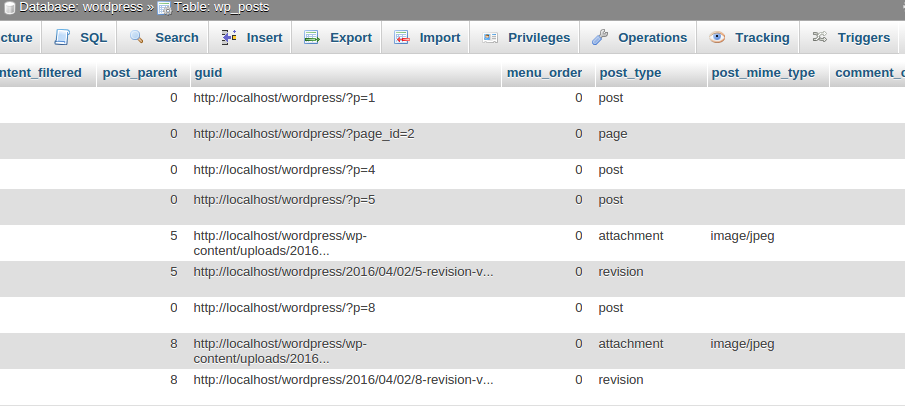
Every information about your image also gets added to your WordPress in the database. This information is stored in the database as an attachment post type under the posts table.
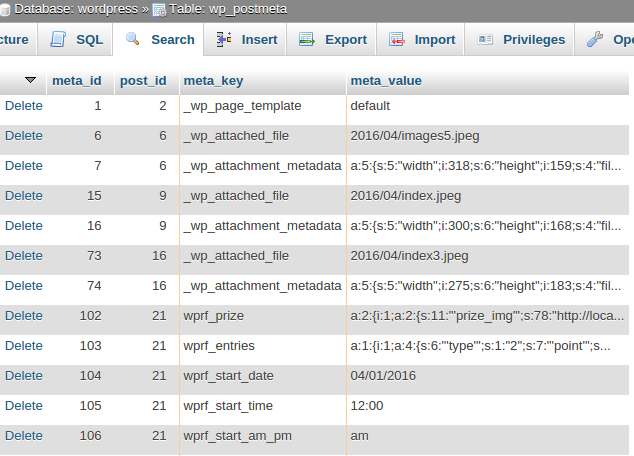
Information is saved in posts meta table in WordPress when you insert images into posts/pages or any other custom type.
When you set featured image also called thumbnails, WordPress saves this information in the form of meta key _thumbnail_id and stores it in the postmeta table of your database.
In case you delete your files from the server using an FTP client, they will be removed from your server but not from the WordPress database. They will now come across as broken images on your WordPress site.
Similarly, if you delete the reference to your images and media uploads from your database, then WordPress will stop showing them in the Media library. Even if all your images are intact and stored on your server.
How to Change the Default Media Upload Location in WordPress
The New Media Uploader is the most important and interesting change in the latest WordPress 3.5. An essential change that has come about is the disappearance of the option to change the upload directory path from Settings. This was removed from the UI due to its lack of usage in comparison to other options.
Learn how to change the default media upload location in WordPress 3.5.
Note: Use this blog only if you know what you are doing. Ignore this if you are a beginner!
To change the default media upload location, first, you need to edit the wp-config.php file located in the root directory of your WordPress installation. In case you want the upload directory to be wp-content/files then you need to enter the following code in wp-config.php
define( ‘UPLOADS’, ‘wp-content/’.’files’ );
In case you want the upload directory to be outside wp-content, like http://www.example.com/files/ then you need to set upload path in wp-config.php like this:
define( ‘UPLOADS’, ”.’files’ );
Don’t forget the you can still choose whether or not you want uploaded files to be organized in month/year folders in Settings » Media.
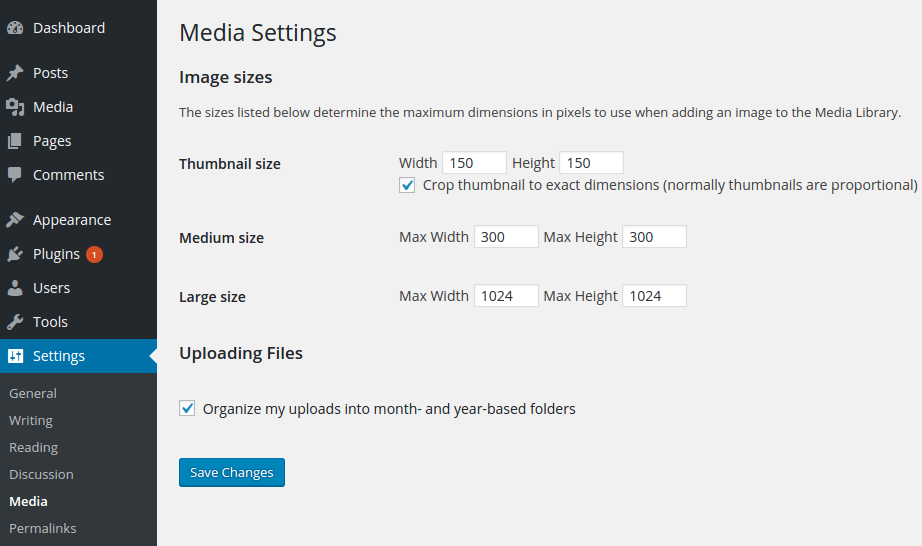
Look at the ‘upload_path’ option, which ideally should be from the web root folder, and it can be used in case it isn’t empty. If it is empty, then the alternate path will be ‘WP_CONTENT_DIR/uploads’. If the ‘UPLOADS’ constant is defined, then it will override the ‘upload_path’ option and ‘WP_CONTENT_DIR/uploads’ path.
The upload URL path is set either by the ‘upload_url_path’ option or by using the ‘WP_CONTENT_URL’ constant and appending ‘/uploads’ to the path.
If the ‘uploads_use_yearmonth_folders’ is set to true (checkbox if checked in the administration settings panel), this format will be used. The format will be year first and then month.
If you are not able to create the path, then an error will be returned with the key ‘error’ containing the error message. The error suggests that the parent directory is not writable by the server.
On success, the returned array will have many indices: ‘path’ – base directory and sub directory or full path to upload directory. ‘url’ – base url and sub directory or absolute URL to upload directory. ‘subdir’ – sub directory if uploads use year/month folders option is on. ‘basedir’ – path without subdir. ‘baseurl’ – URL path without subdir. ‘error’ – set to false.
wp_upload_dir ( string $time = null );
Image Optimization
Image sizes play a crucial role while inserting them into uploads and other pages. The lesser the size, the better it is while uploading.
3 things happen when you Optimize Your Image:
- Quicker upload of images.
- Faster loading for people who visit your page.
- More images can fit into a confined space.
One can not just make the image smaller while editing and make the image size smaller. Optimization of the image is a must.
Different Types of Images:
- The most prefered file format for images with gradients like photographs is JPG.
- For blocks of repetitive color including line art, logos, illustrations with types etc., GIF is most suitable.
- PNG preserves partial transparency and a large amount of colors but it would occupy a lot more space, so one should try the GIF format first to see how well does it work with the image.
Image Editing Software
There are softwares which have easy options to resize and compress a batch of pictures instantly. Paid package as Photoshop/Paint Shop Pro offer to do it, but there is no need to spend money on doing this. These are free:
All the beginners; Click on this YouTube video about Images in WordPress.
[info]Note: This is the first part of the 3 Part Ultimate Guide About Images in WordPress series.
To read the 2nd and 3rd parts, refer Ultimate Guide About Images in WordPress-II and Ultimate Guide About Images in WordPress-III[/info]
Also, read about How to upload large images in WordPress. Click here.


Leave a Reply