Update WordPress to Keep Hackers at Bay

You always have qualms when you have to Update WordPress!
Every time you log into your website, a message saying that a new update is available has been flashing for days now.
You don’t seem to be too keen on doing it! Is it that you are too lazy or that you have no time for such updates that come regularly? Or are you worried that this update might just crash your website?
I acknowledge all your concerns, but I assure you that these updates are 100% secure.
Even the FBI recommends them!
Former versions of WordPress, especially plugins are often more susceptible for the hackers to prey on. That’s the foremost reason you should always keep your WordPress website updated.
No.1 Reason to Update WordPress to the latest version: Security!
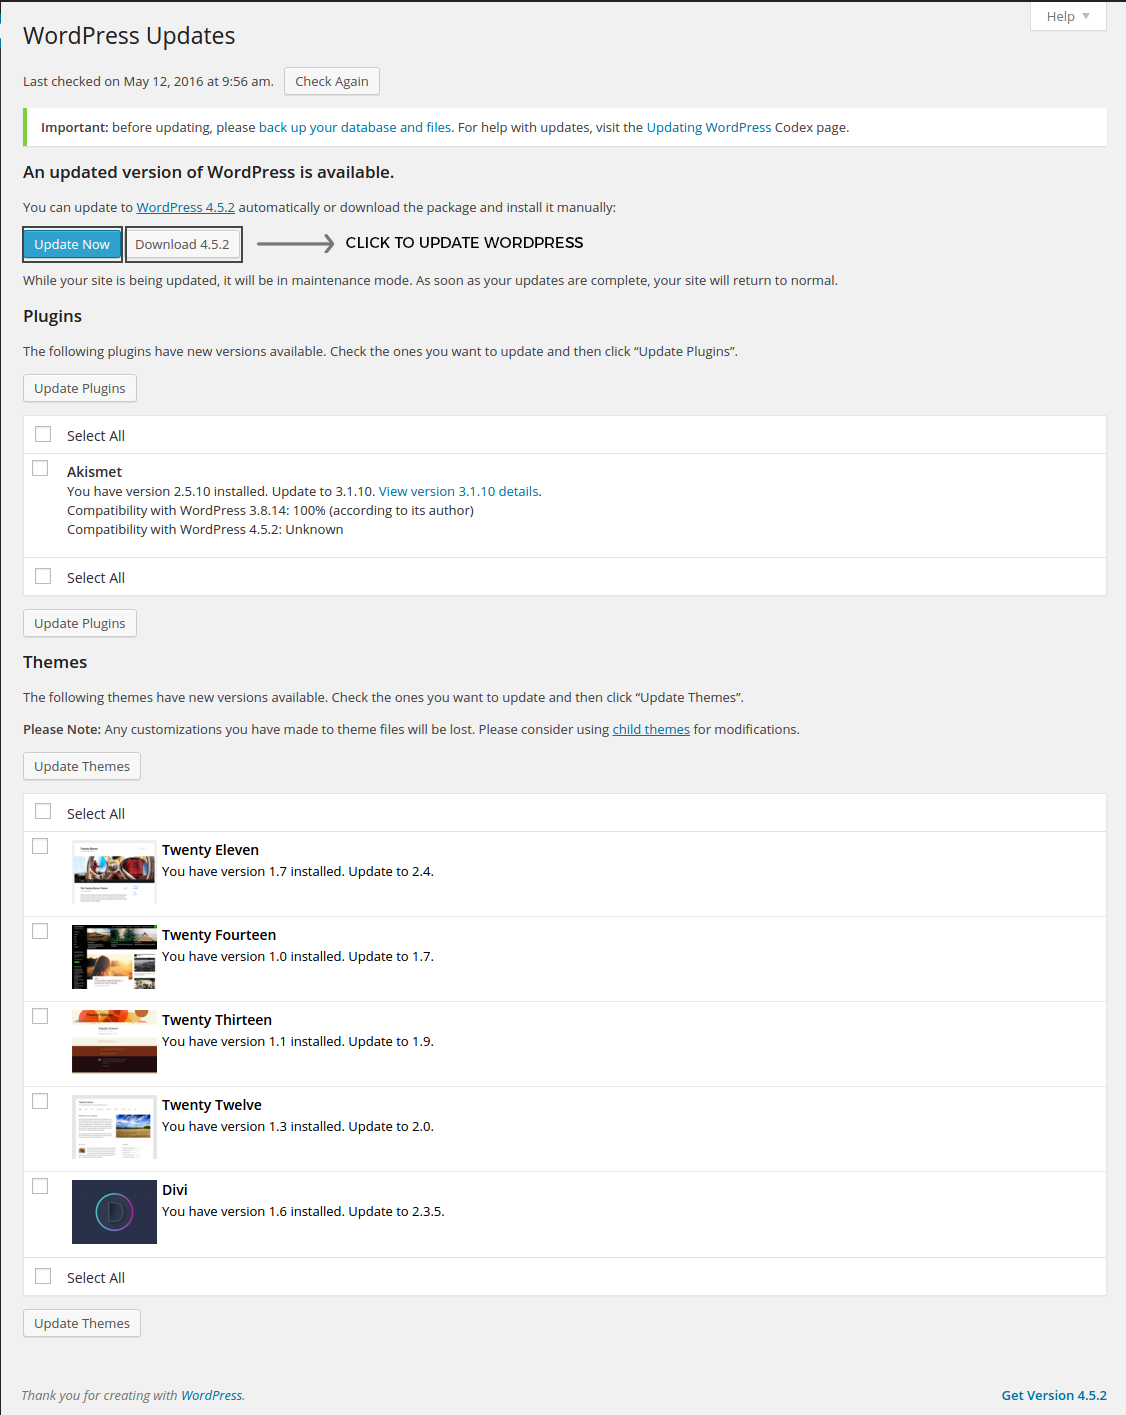
WordPress notifies about any new version by sending you an update message in your WordPress Admin Screen. The message displayed will be: To update WordPress, click the link in this message.
This update can be done in two ways – One-click method, which will be the easiest for all users. In case it doesn’t work, or you’d prefer a step-by-step manual update process.

Supposing, you have multiple versions to update; follow the steps mentioned at Upgrading WordPress – Extended Instructions
Backup WordPress
Before you begin the process of updating WordPress always take a backup of your website. In case you face any problems, you can restore your website. All the steps to make a backup can be found in the WordPress Backups.
Automatic Background Updates
For WordPress 3.7+, you don’t have to knock yourself out to apply security and other minor updates. For most of the website, these updates are often done in the background. Check whether your site is capable of one-click updates without entering FTP details, then it can be confirmed that it can update from 3.7 to 3.7.1, 3.7.2, etc. (For major feature releases you still must click “Update Now”)
Update WordPress in One-click
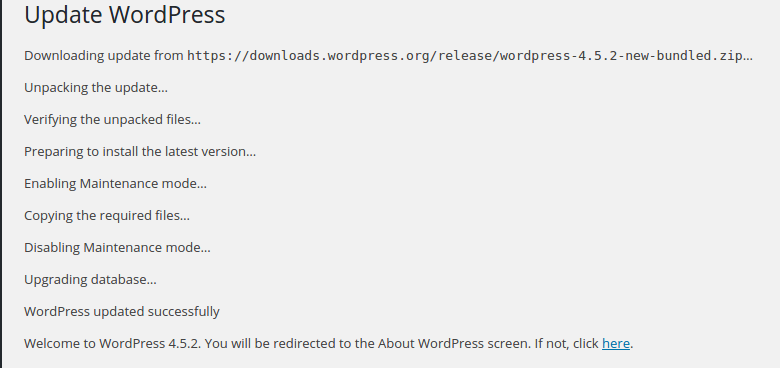
All the versions of WordPress above 2.7 let you update it with a click of a button. You can start the update by clicking the link provided in the latest version banner (if present) or by going to the Dashboard > Updates screen. After reaching the “Update WordPress” page, go to the “Update Now” tab to kick start the process. That’s all that you need to do from your end, once finished, you’ll be good to go!
This One-click updates work on most available servers. In case you come across a problem, it will be mainly related to permissions issues on the filesystem.


File Ownership
On the basis of the file ownership of your WordPress files, WordPress will determine what method will it use to connect to the file system. If on observation, it finds that the files are owned by the owner of the current process (the user currently under which the web server is working), and all the latest files by WordPress will also be owned by the same user. In this case, WordPress will directly make these changes without seeking for your permission.
If the user doesn’t have correct ownership, WordPress won’t intend to create the new files directly. Rather, a dialog box will pop up asking for your connection data. Usually, files are owned by the FTP account that originally uploaded them. For the update process, you need to fill the connection data for your FTP account.
The manner in which you’ve downloaded WordPress and the server configuration will decide whether your files are owned by the web server user, or not. It is a risk of some shared hosting platforms for files to be owned by the web server and not a FTP user.
Failed Updates
If you are coming across a “failed update” message, you need to delete the .maintenance file from your WordPress directory using FTP.
Don’t panic if the one-click upgrade hasn’t worked for you. Just go ahead with the manual update.
Also read: 7 Common WordPress Issues and How to Fix Them
Manually Update WordPress
The following mentioned instructions are shortly described. If you want detailed instructions, check out the extended upgrade instructions. If you experience problems with the Three Step Update, you may want to review the more detailed upgrade instructions
Here, I’ve assumed your blog’s URL is http://forexample.com/wordpress/.
Step 1: Replace your WordPress files
- Download the latest WordPress zip (or tar.gz) file.
- Extract the zip file that you downloaded.
- Deactivate plugins.
- You are expected to delete the old wp-admin and wp-includes directories on your web host (through your FTP or shell access).
- Using shell access or your FTP, upload the new wp-admin and wp-includes directories to your web host, instead of the previously removed directories.
- As per requirement, upload the individual files from the new wp-content folder to your existing wp-content folder, overwriting existing files. Please note: Do NOT delete your existing wp-content folder. Also, Do NOT delete any files or folders in your existing wp-content directory (except for the one being overwritten by new files).
- Upload only those loose files from the new version root directory which are essential to your existing wordpress root directory.
NOTE – Make sure that you replace all the old WordPress files with the new ones in the wp-admin and wp-includes directories and subdirectories, and in the root directory (such as index.php, wp-login.php and so on). Be assured – Nothing will go wrong with your wp-config.php.
Coming to a very crucial aspect. Copying content from the wp-content directory. Copy content only from inside the directory, do not replace the entire wp-content directory. Your themes and plugins live here, keeping them safe is in your hands!
In case you have customized the default or classic themes and kept their original file names, you might want to be careful or else you can lose those changes.(Though you might want to compare them for new features or fixes.)
Lastly, go through the wp-config-sample.php file, to make sure you do not miss out on the latest settings added, you might want to use them!
Step 1.5: Remove .maintenance file
If you’ve already tried the auto-upgrade and have failed, you have to delete file .maintenance from your WordPress directory using FTP. This will stop the nagging “failed update” message from appearing.
Step 2: Update your installation
Go to your WordPress admin page at /wp-admin. You’ll be asked to login again. WordPress will detect by itself if a database upgrade is required. If yes, it will give you a link to a URL like http://forexample.com/wordpress/wp-admin/upgrade.php. Click on the link and keep following the instructions. Your database will now be compatible with the latest code. You should do this as soon as possible after step 1.
It’s important to reactivate plugins!
Step 3: Make Sure You Check Every Detail
Clearing of caches has to be done immediately, in case you have caching enabled. You can save all the changes to go live promptly. Otherwise, visitors to your site (including you) will be able to see the old version (until the cache updates).
Final Steps to Update WordPress
Your update is now complete, so you can go in and enable your Plugins again. If you have issues logging in, try clearing cookies in your browser.
Remember, make sure you update your WordPress to the latest version to avoid any glitch in your website. We hope this guide helped you to update WordPress on your site. For questions and suggestions, please comment below.


Leave a Reply