How To Create An Entrepreneur Website with WordPress
Are you looking to create an entrepreneur website with WordPress?
Building a website as an entrepreneur is essential in today’s digital age. It provides a platform to showcase yourself, your portfolio, and your business to a global audience. So if you are an entrepreneur, you can build a website quickly and efficiently with the right tools and guidance.
This article will cover the critical steps to creating a professional and effective entrepreneur website. Whether starting from scratch or updating your existing site, these tips will help you create a website that showcases your brand and drives traffic to your business.
How to Create an Entrepreneur Website with WordPress (Step-by-Step)
To create an entrepreneur website with WordPress, all you have to do is to follow the steps below:
Step 1: Choose a Platform to Create a Website
The first step to creating an entrepreneur’s website is to choose a platform to build it. Many website builders are available, both paid and free, making it easy to create a website without technical expertise. Some popular options include WordPress, Wix, Squarespace, and Weebly.
When choosing a platform, it’s essential to consider your technical skills and budget. Some website builders may require technical knowledge, while others do not.
If you are a beginner, we recommend using WordPress since it is a popular content management system (CMS) with an easy-to-use interface to create and manage a website easily.
Plus, it is free to use and has a large community of users, various plugins, and themes to extend its functionality without needing technical knowledge.
Step 2: Define Your Purpose
Before you build your website, you must define your purpose and target audience.
What do you want your website to achieve? Whom are you trying to reach with your website? Knowing your purpose and target audience will help you make informed decisions about your website’s design, content, and functionality.
For example, if you aim to showcase your portfolio, you’ll want to focus on a visually appealing design that highlights your work.
If your purpose is to promote your business and attract new clients, you’ll want to focus on a design that communicates the benefits of your services to your visitors and provide them with an easy way to get in touch with you.
Step 3: Choose a Domain Name and Hosting
Once you’ve chosen your platform and defined your purpose, it’s time to choose a domain name and a hosting service. Your domain name is the address that people will use to access your website (e.g., www.example.com). It should be short, memorable, and easy to spell.
Hosting is the service that stores your website files and makes them accessible on the internet. When choosing a hosting service, consider the reliability, speed, and support offered and the cost.
However, if you are building a WordPress website, we recommend using a WordPress-specific host such as Kinsta for your requirements.
Why Choose Kinsta?

With multiple hosting providers available, here are six reasons why we recommend Kinsta as the best choice to host your WordPress website.
- Kinsta is a managed WordPress hosting provider.
- They handle technical aspects of hosting, such as security and updates.
- Kinsta uses Google Cloud Platform for hosting, ensuring fast and reliable performance.
- Kinsta’s platform is easy to use with a custom control panel.
- They offer advanced features like staging environments and automatic backups.
- Kinsta provides 24/7 support from a team of WordPress experts.
All these features make Kinsta the ideal choice for hosting your WordPress-based entrepreneur website.
After choosing Kinsta, it provides you with a simple one-click option to install WordPress on your server, and you will be ready to move on to the next stage of setting up your website.
Step 4: Design Your Website
Design is a crucial aspect of your website, as it sets the tone for your brand and helps visitors form an impression of your business. When designing your website, remember the following points:
- Color: Your chosen colors should be consistent with your brand and appealing to your target audience. Select a color palette that is aesthetically pleasing and easy on the eyes.
- Layout: The layout of your website should be easy to navigate and help visitors find the information they need. Consider using a clean, straightforward design that focuses on your content.
- Images: High-quality images are a great way to showcase your brand and tell your story. Make sure to use relevant images that capture your target audience’s attention.
- Content: The content on your website should be clear, concise, and focused on your target audience. Use language that is easy to understand, and avoid using complex terminology.
- Responsiveness: Many people use their mobile devices to access the internet. Hence, your website must be responsive and adjust to any device’s screen size.
You can easily set up all this using the themes feature in WordPress. Themes offer a basic design and content framework for your website, so you don’t have to worry about creating everything from scratch.
Step 5: How To Install Responsive Theme
Install a simple responsive WordPress theme to save you time and launch your website easily. Responsive theme is powerful and versatile, allowing entrepreneurs to set up their websites with zero bottlenecks.
Here’s a step-by-step guide to installing the responsive theme and its entrepreneur template to help you get started with your website instantly.
Install the Responsive Theme
Once you have installed and set up WordPress on your server.
Go to the WordPress dashboard and click on Appearance > Themes.
Click on the Add New button.

Type “Responsive” in the search, hover over the Responsive theme, and click on the “Install” button.


Click on the “Activate” button to activate the Responsive theme.

Congrats you have successfully installed and activated the Responsive theme on your website.
Step 6: Install Responsive Starter Templates Plugin
Next, you should install the “Responsive Starter Templates” plugin to access 100+ starter templates that you can easily import to build your entrepreneur website. To do that,
Go to your WordPress dashboard, hover over “Plugins” and click “Add New“.

In the search bar option, look for “Responsive Starter Templates” and click “Install Now“.

Once you have installed the Responsive Starter Templates plugin, click the “Activate” button.

Step 7: Install The Entrepreneur Template
The final step in this process is to import the Entrepreneur Template to create an entrepreneur website.
To import, hover over Responsive in the WordPress dashboard and click on “Responsive Templates“.

Search for Entrepreneur in the search bar option, and click on the “Entrepreneur Portfolio” template.

The next step in this process is to click on the “Import Site” button.

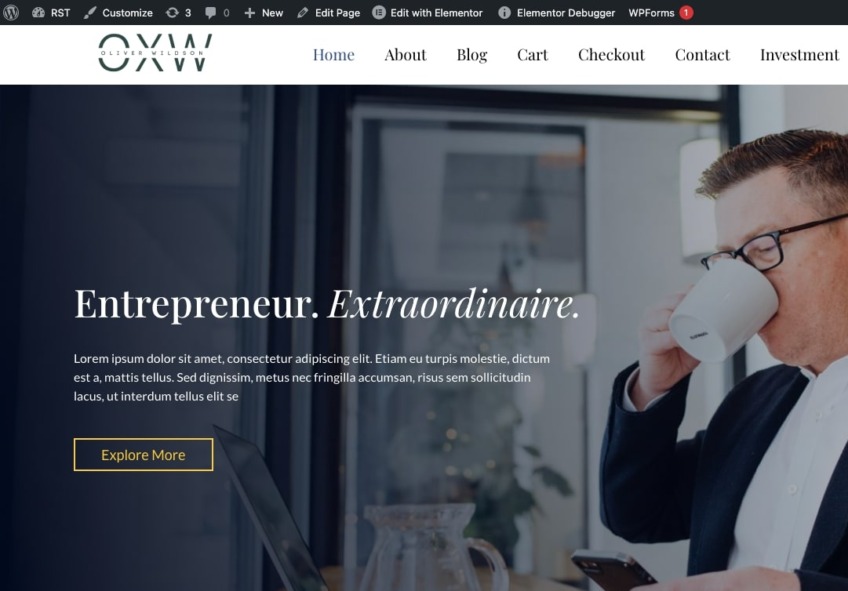
Once the import is complete, click on the “Launch Site” button to launch the Entrepreneur template.

And voila! Your entire entrepreneur website template is completely set up and ready to customise to your needs and preferences.
After launching, your entrepreneur’s website will look like this.
Step 8: Add Content to Your Website
Once you have set up your website template, it’s time to add content. Your content should be relevant to your target audience and help visitors understand who you are, what you do, and why they should choose your business.
You can edit the Entrepreneur website as per your choice using the “Edit with Elementor” button and click on the “Update” button to launch or publish your entrepreneur website.

Step 9: Optimize Your Website for Search Engines
Search engine optimization (SEO) helps your website rank higher in search engine results, attracting more organic traffic, leads, and sales. To optimize your website for search engines, conduct keyword research, write descriptive and keyword-rich title tags and meta descriptions, ensure your URLs are easy to read, and include relevant keywords and alt tags to your images.
Here are some tips to help you optimize your website for search engines:
- Keyword research: Research keywords related to your business and include them in your website’s content, titles, and meta descriptions. This will help search engines understand what your website is about and improve its visibility in search results.
- Title tags: Write descriptive and keyword-rich title tags for each page of your website. These tags should be unique for each page and accurately describe the content on that page.
- Meta descriptions: Write compelling meta descriptions that summarize the content of each page and include relevant keywords. These descriptions should be short and to the point and entice your visitors.
- URL structure: A clear and organized URL structure can help search engines understand your website’s content, leading to better visibility and improved search engine ranking.
- Alt tags: Alt tags, also known as alt descriptions, provide a brief text description of images on your website. This is used by screen readers for visually impaired users and indexed by search engines, allowing your pictures to appear in image search results.
Know Your Target Audience
It’s essential to clearly understand your purpose and target audience when creating an entrepreneur website. This will guide your decisions regarding the website’s design, content, and functionality.
For example, your target audience is young professionals. In that case, you may want a more modern and sleek design, while a more traditional method may be more suitable if you’re targeting older generations.
Knowing your target audience will also help you determine the type of content you need to include on your website. And ensure your content is relevant and valuable to your target audience.
Bring Traffic To Your Website
Once your website is live, promoting it to attract visitors and build traffic is essential. Here are some ways to promote your website:
- Social media: Sharing your website on social media platforms such as Facebook, Twitter, and Instagram effectively reaches a large audience and drives traffic to your site. Engage with your followers by responding to comments and messages and creating interactive content.
- Content marketing: Creating valuable and relevant content for your target audience is a great way to establish your brand as an authority in your industry and attract visitors to your site.
- Email marketing: Email marketing is a powerful tool for reaching subscribers and promoting your website and business. Create a targeted email list, segment it based on subscriber preferences and behavior, and send personalized and relevant content to drive traffic and conversions.
- Networking: Networking is important in building relationships and promoting your website and business. Attend events, join online communities, and connect with others in your industry to build relationships, share your knowledge, and promote your website.
Of course, there are many other methods, including pay-per-click advertising and influencer marketing, to name a few. The key is finding the best business methods and implementing them consistently.
To Wrap It Up
Creating an entrepreneur website can be a fun and rewarding experience. With a hosting provider like Kinsta and an incredible theme like Responsive, you can build a professional and effective entrepreneurial website within minutes. Good luck!
If you have enjoyed reading this article, check out our other engaging articles:
- Reasons Why Entrepreneurs Should Use WordPress
- eCommerce Mistakes To Avoid in 2022
- How to Create a WordPress Business Directory Website using WP Local Plus
Are you excited to create an entrepreneur website? Grab the Responsive theme now!

Leave a Reply