How to Create a Doctor Website using WordPress

Are you a doctor looking to create your website?
With healthcare becoming increasingly online, doctors and healthcare professionals recognize the need for a solid digital presence.
A doctor website can help you connect with patients, build your brand, and provide important information and resources to help people improve their overall health and inform people about your services.
In this article, we’ll explore how to create a doctor website on WordPress in minutes without any technical knowledge required.
How to Create a Doctor Website with WordPress (Step-by-Step)
Follow these simple steps to create a doctor website using WordPress.
Step 1: Choose a Domain Name and a Hosting Provider
Before building your website, you must choose a domain name and a web hosting provider. Choosing a domain name that is easy to remember and relevant to your practice will make it easy for people to find your website.
For example, if your name is Dr. John Mathew specialized in Cosmetology, you could choose a domain name like “johnmathewcosmetology.com”.
You can easily register a domain name using any online domain registrar like GoDaddy, Namecheap, Google Domains, Bluehost, Domain.com, etc.
However, when you are just starting, you can choose a registrar offering a plan that fits your budget.
Then the next step is to select a web hosting provider. Although there are many web hosting providers, you should find one that appeals to your needs, requirements, and budget.
Some popular hosting providers are Bluehost, SiteGround, WP Engine, etc. However, we recommend using Kinsta for its easy UI, reliability, and excellent customer support.

Kinsta allows its users to host WordPress with a one-touch installation which we will cover in the next section of this tutorial.
Step 2: Install WordPress
Once you’ve chosen your domain name and web hosting provider, you must install WordPress.
Many web hosting providers like Kinsta offer one-click WordPress installations, making the process quick and easy.
Suppose your web hosting provider doesn’t offer this option. In that case, you can download WordPress from the official website and follow the installation instructions.
Step 3: Choose a WordPress Theme

Once you have installed WordPress, you’ll need to choose a theme for your website. WordPress themes are customizable pre-designed templates that you can use to create a unique look and feel for your website.
Many free and paid WordPress themes are available, which can make this step unnecessarily complicated. Hence it is better to avoid the noise and set up your doctor website using the Responsive theme.
Responsive is a fast, lightweight, and fully customizable theme with 100+ website templates to help instantly create a doctor website, making it easy for anyone to set up.
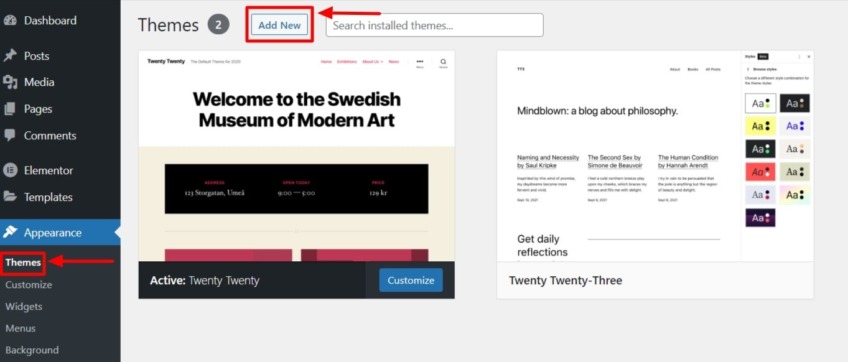
To install the Responsive theme, go to your WordPress dashboard and click Appearance > Themes > Add New.
Then search for “Responsive“.
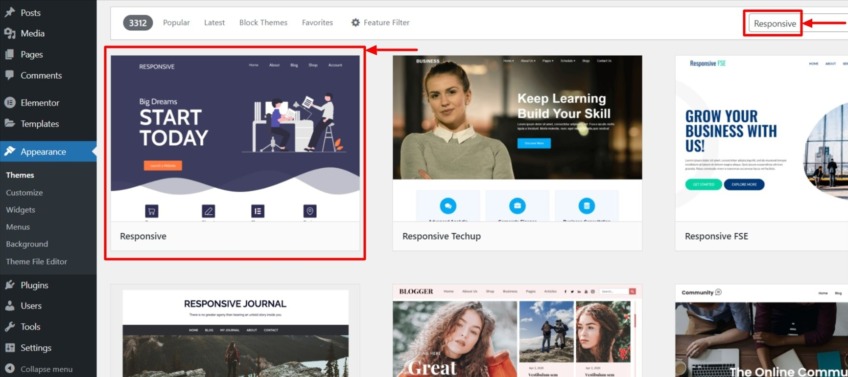
Hover over the Responsive theme and click Install.
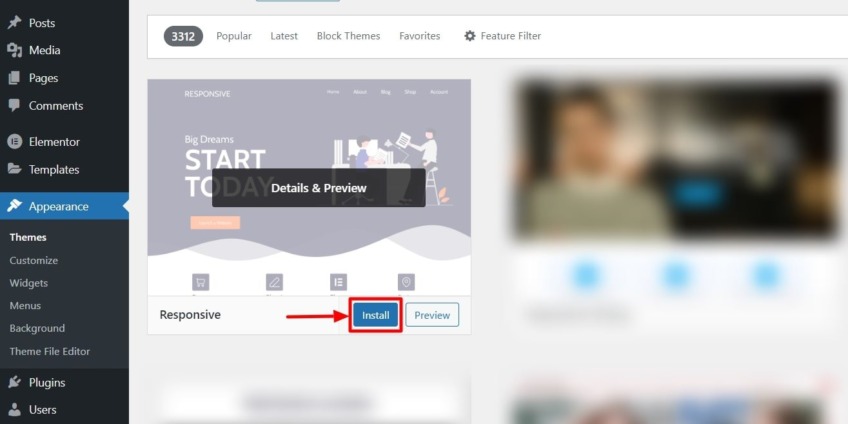
After installation, click Activate to apply it to your website.

Step 4: Install Responsive Starter Templates Plugin
Once you have installed and activated the Responsive theme, you must install the Responsive Starter Templates Plugin, giving you access to a library of over 100+ starter templates.
You can easily search and install a doctor website template from there and quickly get started with your website.
Go to your WordPress dashboard and select Plugins > Add New to do this.

Search for “Responsive Starter Templates” and click the “Install” button.
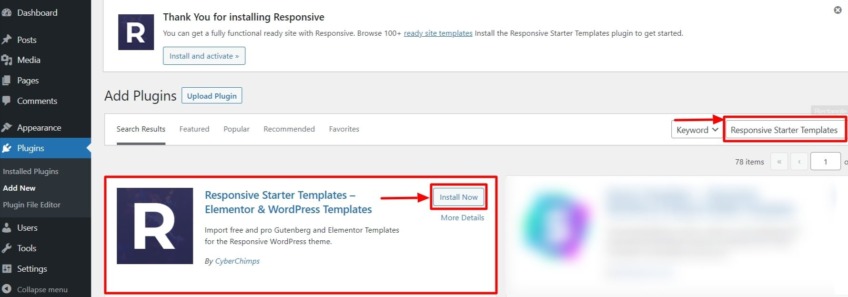
Once installed, click on the “Activate” button.

Step 5: Import a Doctor Website Template
After installing and activating the Responsive Starter Templates plugin, you can access a range of pre-made templates that will provide you with a basic framework for your doctor website.
To install a doctor website template, go to Responsive > Responsive Templates.
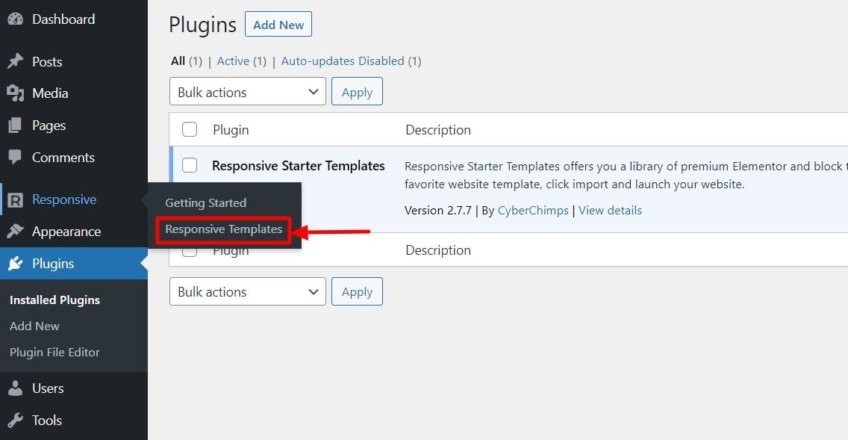
This will open up the 100+ free and premium Responsive Starter Templates list.
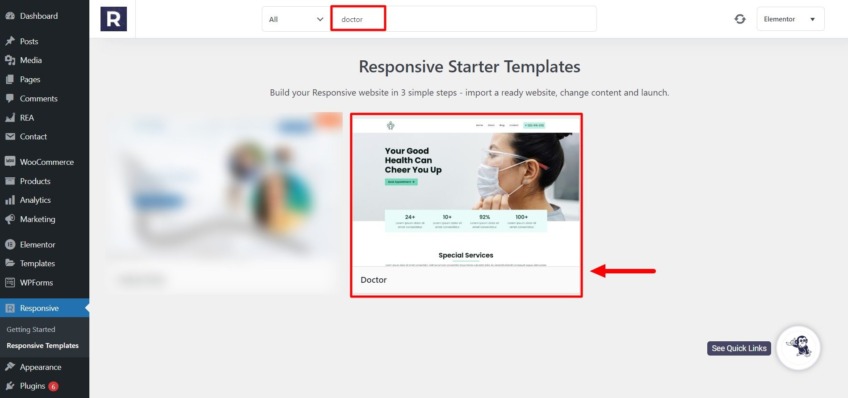
From here, search for “Doctor” in the search bar, and click on the “Doctor” template.
Click on the “Import Site” button.
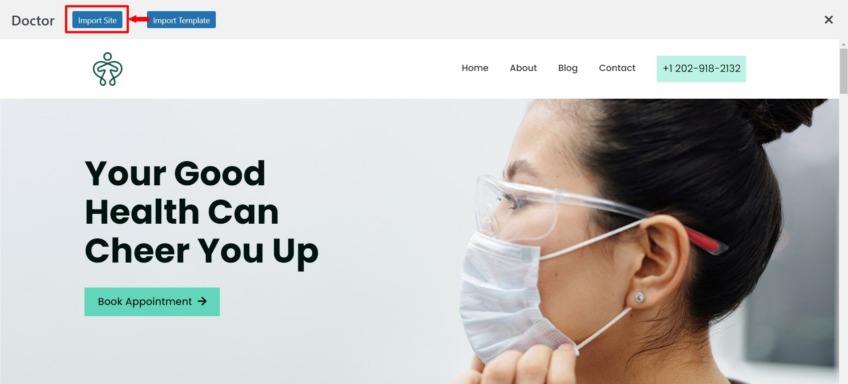
After Importing, click the “Launch Site” button to launch the Doctor template.
Step 6: Edit with Theme Customizer
Once you launch the template, you can choose from different settings to customize the various categories of your ready-made doctor website to fit your needs.
To edit the theme settings, click on the “Customize” button.
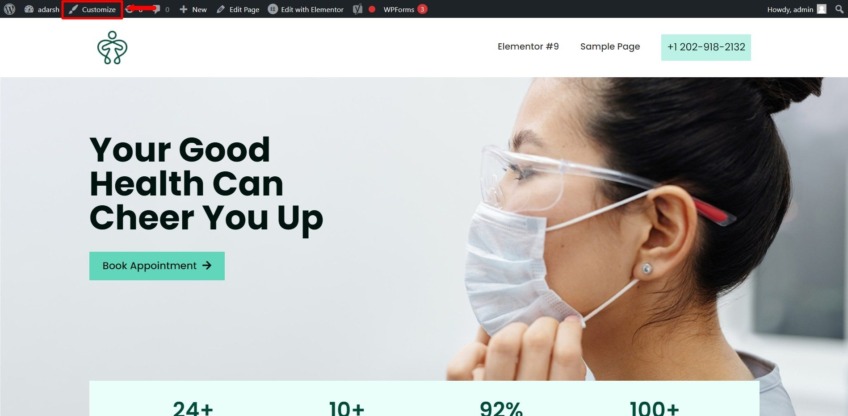
Here, you’ll get all the settings to make theme-related styling settings.
You can add, remove, and edit – logos, pages, menus, and other content using the same menu options.
You can use this option to make sure your doctor website includes several important pages about your practice and services, such as:
- Home page – provides an overview of your practice and services
- About page – to introduce you, your team, qualifications, and experience.
- Services page – listing your services, such as consultations, tests, and treatments
- Patient information page – with hours of operation, location, insurance information, etc.
- Blog page – with updates, insights, healthcare tips, and medical news for patients to maintain their health
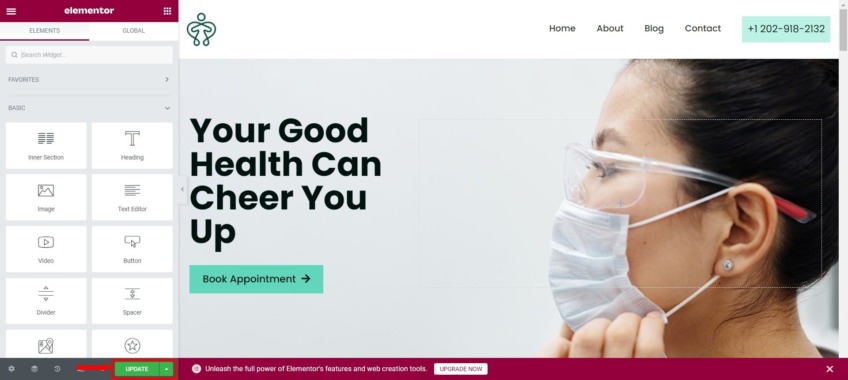
Step 7: Edit Your Content with Elementor
Once you have customized using theme customizer, ensure all the essential pages for your doctor website are available. After that, it’s time to make your website unique and personalized.
You can do this by adding and editing the main content of your website, such as text, photos, media, and more, on any of your pages.
To do this, go to the page you wish to edit and click “Edit with Elementor”
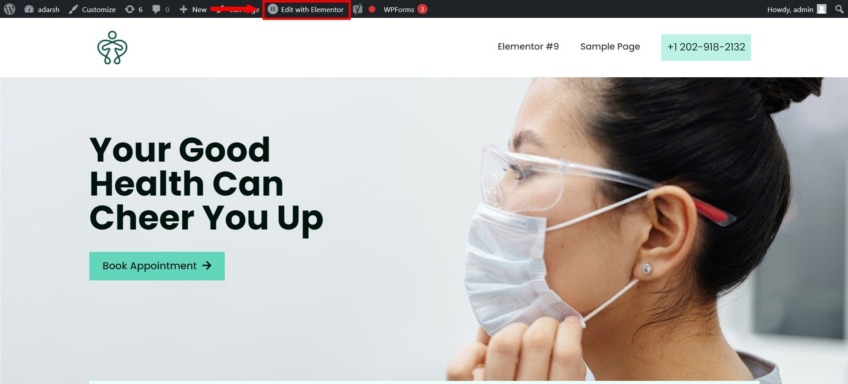
You can customize your website’s typography, settings, images, videos, buttons, and more.

Hover over the content you like to edit and make quick changes on the go.
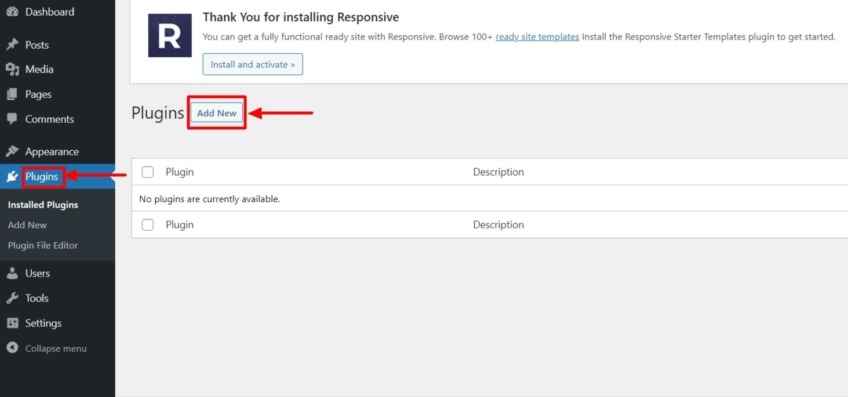
Step 8: Install Essential Plugins
Now that you know how to add pages and edit the content on your doctor website. Let’s introduce you to Plugins.
Plugins are small software that can be added to your WordPress website to enhance functionality.
The Doctor Theme comes pre-loaded with essential plugins such as Elementor and WPForms Lite, providing an excellent starting point.
You can quickly add new functionalities to your website by going to your WordPress dashboard, clicking on the “Plugins” menu, and click on the “Add New” button.
If you are not sure what plugins to install, here are a few plugins you can consider:
- Yoast SEO – helps optimize your website for search engines
- Google Analytics – tracks website traffic and user behavior
- UpdraftPlus – backs up your website to prevent data loss in case of a website crash
- WP-Chatbot – adds a chatbot to answer common questions on your website
- Medical Directory – display a directory of medical professionals on your website
You can install these plugins by typing their name on search after clicking Add New.
Step 9: Publish Your Doctor Website
Once you have customized the content of your website, review it and click on “Update”.
Your Doctor website is now live and ready to receive traffic.
How To Market Your Doctor Website?
The above guide will help you set up and launch a Doctor website within minutes. Once you do that, it is important to understand how to attract traffic to your doctor website.
Suppose you include your website URL or domain name. Your doctor website will receive traffic from offline sources, such as your business cards and prescription letters.
Apart from that, there are a few tips that you can use to help new patients find you through your doctor website organically. Here are a few of them that you may use.
Tip 1: Optimize for Search Engines
Ensure that your doctor website includes relevant keywords in its content and is optimized with appropriate meta tags.
Some additional tips for optimizing your doctor website for search engines include:
- Using descriptive URLs for each page
- Using alt tags for images to make them more searchable
- Making your website mobile responsive
- Include your location and contact information on your website to improve local SEO
- Using Google My Business to manage your online presence and appear in local search
If you are using the Doctor Theme from Responsive, your website will already be optimized for all screen sizes and will be mobile responsive.
Tip 2: Create Quality Content
Create quality content to engage your audience and establish authority in your field.
You can write blog posts, videos, infographics, articles, health tips, the latest medical research, FAQs, etc. that provides value to your patients.
When creating content for your doctor website, be sure to,
- Use a friendly and conversational tone that is easy to read
- Make it easy to understand for your audience
- Avoid heavy usage of medical terms and jargon unless it is aimed at such readers
- Use images and illustrations in your content to make it more engaging
- Share your content on social media
You can also optimize your content by including relevant keywords in your content. This will make your content more discoverable in organic search results.
Tip 3: Promote Your Website
Once your doctor website is up and running there are multiple ways you can use to promote it. Such as:
- Including your website address on your business cards, brochures, and flyers
- Asking your patients to visit your website and leave reviews
- Sharing your website content on social media and engaging with your patients online
- Using paid advertising, such as Google Ads or Facebook Ads, to reach new audiences
These techniques can help expand your reach online and establish your digital presence. They will ultimately help you reach more patients and widen your medical practice.
Tip 4: Maintain Your Website
Finally, it’s essential to regularly maintain your doctor website to ensure that it functions correctly and provides a positive user experience.
- Update your WordPress themes and plugins to ensure website security
- Backup your website regularly to avoid the loss of any data
- Monitor your website traffic and user engagement to identify areas for improvement
- Respond to patient inquiries and feedback promptly
By following these best practices and implementing the steps outlined in this article, you can create a professional and effective doctor website on WordPress that helps you easily connect with patients and grow your medical practice.
To Wrap It Up
Creating a doctor website on WordPress can help attract and retain patients effectively. Following the steps outlined above, you can easily set up a professional-looking website that is easy to use and optimized for search engines using the Responsive WordPress theme.
Using the above tips and your creativity, you can create a helpful and interactive Doctor website that attracts new patients and establishes your authority online.
If you enjoyed this article, check out the following:
- How To Create An Entrepreneur Website with WordPress
- How to Create a One Page WordPress Website
- How to Create a Photography Studio Website with WordPress
Download the Responsive theme today and start building your doctor website today!
Leave a Reply